
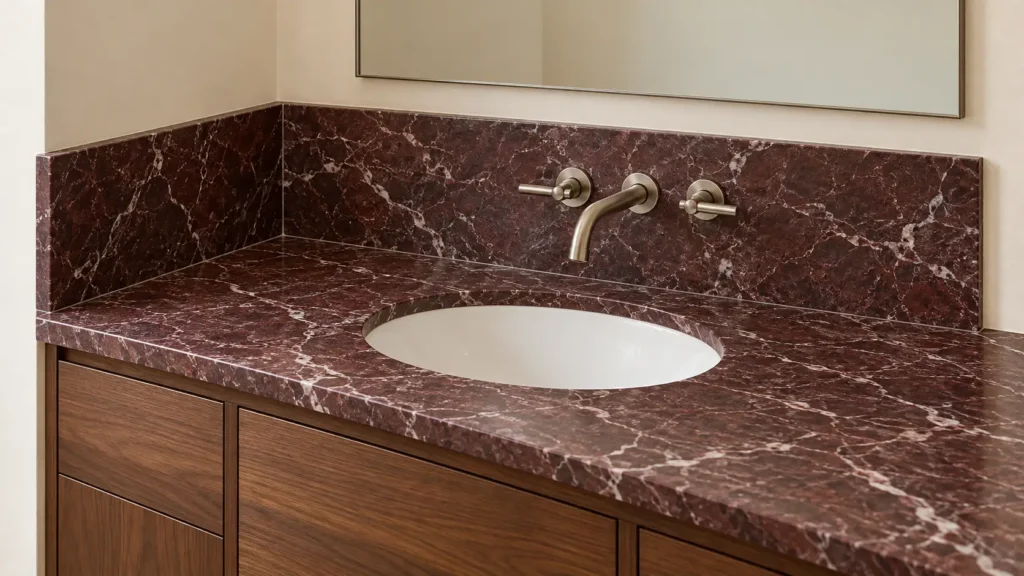
A marble vanity backsplash is the vertical stone surface behind a bathroom countertop. It can be a low upstand, a panel rising behind the taps or a larger surface continuing around the mirror. Its height should respond to splash exposure, fittings and the wall elevation.
For architects, the critical decisions are where the stone starts and stops, how it meets the countertop and what happens at the side walls. Resolve those junctions before fixing the backsplash dimensions.
This guide covers natural marble. Cultured marble and other manufactured materials sold under similar names require their own product specifications.
Choose the Height from the Whole Elevation
There is no single backsplash height that suits every vanity. Draw the basin, tapware, mirror and lighting together before selecting the top line.
| Arrangement | Architectural effect | What needs coordination |
|---|---|---|
| Low upstand | Creates a narrow stone band above the countertop | Deck-mounted tap clearance, exposed top edge and wall finish above |
| Panel behind wall-mounted taps | Makes the fittings part of the stone elevation | Rough-in depth, penetrations, escutcheons and mirror position |
| Stone continuing behind the mirror | Forms a larger material surface | Mirror support, concealed areas, fixing penetrations and panel joints |
| Shaped or stepped backsplash | Establishes a distinct outline | Cutting geometry, exposed edges and transitions to side returns |
Use the basin and tap arrangement to assess the area likely to receive water. A low strip may leave much of the wall behind a tall vessel basin exposed.
If a stock product is being considered, treat its listed height as a product dimension. Confirm that it suits the project rather than adopting it as a design standard.
Dimension the Visible Height Separately from the Cutting Height
State the backsplash top level from an agreed datum, such as the finished countertop surface. Then show where the stone’s lower edge sits.
A panel resting above the countertop and a panel extending behind it can have the same visible height but different cutting dimensions. The installation sequence also changes.
For the chosen arrangement, draw:
- Finished countertop level and actual stone thickness.
- Visible backsplash height and overall piece height.
- Bottom-joint location.
- Backing, fixing zone and finished stone face.
- Top-edge profile and adjoining wall finish.
Check wall flatness before fabrication. A straight stone strip against an uneven wall can leave a variable top or end joint. Agree how the substrate will be prepared and which dimensions require site verification.
Resolve the Side Splash in Plan
A side splash is a separate piece of stone protecting an adjoining wall. It needs its own length, height, edge finish and corner detail.
Decide whether it ends at the countertop’s front edge, stops short or aligns with another element. Check the result against the countertop profile and cabinet below.
Where the rear and side splashes meet, show which piece passes through and which terminates against it. That decision changes the cutting length of the returning piece.
For example, a side splash fitted between the face of the rear backsplash and its front termination must be dimensioned from that rear stone face. Measuring from the unfinished back wall would produce a different piece.
A freestanding end of a vanity does not automatically need a side splash. Identify where an adjacent wall actually needs protection and where an exposed countertop edge completes the composition.
Coordinate Wall-Mounted Tapware with the Finished Stone Face
Wall-mounted fittings require the stone thickness and installation build-up to be established before plumbing rough-in.
Use the selected fitting manufacturer’s installation range to coordinate the valve body with the finished backsplash face. Check the complete assembly rather than adding marble thickness after the plumbing has been set.
Before approving penetrations, confirm:
- Exact fitting models and current installation drawings.
- Spout and control centre lines.
- Required opening sizes.
- Escutcheon coverage around each opening.
- Clearance from stone edges and joints.
- Access needed for installation and later servicing.
Place the spout in section relative to the basin. The backsplash can look correctly proportioned while the outlet projects poorly over the bowl.
For deck-mounted taps, review handle movement and the space available for cleaning between the tap and the vertical stone.
Give the Mirror Junction an Explicit Detail
Choose whether the mirror sits above the backsplash, overlaps it or mounts in front of a larger stone panel.
When the mirror sits above, dimension the gap and identify the wall finish within it. A narrow strip of wall should be practical to finish and clean.
When stone continues behind the mirror, show the concealed stone extent and coordinate fixings with the mirror supplier. Establish how the mirror will be removed without damaging the backsplash.
A mirrored cabinet also needs its door swing checked. Its lower edge and opening movement can conflict with tapware, a projecting stone top edge or nearby lighting.
Finish the Ends as Carefully as the Face
The top and exposed ends remain visible on many vanity backsplashes. Include them in the fabrication schedule.
Specify the intended edge profile and finish. Show whether the stone terminates against a side wall, a cabinet, a mirror frame or an exposed vertical edge.
If a side return has a shaped end, draw the geometry rather than describing it only as “matching.” A shaped rear panel and a straight side splash also need a deliberate transition at the corner.
For expressive stone, review the countertop, backsplash and side pieces together. Mark their orientation and intended pattern relationship on slab photographs.
Rosso Levanto marble has a deep burgundy background with striking white veining. In a narrow backsplash, the selected cutting area determines how much of that movement remains visible. Review actual slabs rather than expecting a small sample to predict the finished composition.
Detail Joints and Cleaning Together
Identify the countertop-to-backsplash joint, inside corner and interfaces with other finishes. Confirm compatible joint and fixing materials with the stone fabricator and installation suppliers.
A tight stone-to-stone fit does not describe how the junction accommodates movement or manages water. Where the vanity forms part of a wider wet-area assembly, coordinate the backing and waterproofing requirements as well.
Include practical care instructions in the handover information. The Natural Stone Institute’s care guidance recommends neutral or suitable mild cleaners and explains that acidic products can etch calcareous stone. It also distinguishes improved stain resistance from stain-proofing.
At a vanity, review how mirror cleaning products will be used so that runoff does not damage the marble below.
What to Include in the Backsplash Package
Issue a coordinated elevation, plan and section with a separate reference for every rear and side piece.
The package should establish:
- Verified dimensions, thicknesses and finished levels.
- Countertop and backsplash installation sequence.
- Side-splash lengths and corner arrangement.
- Tap openings and approved fitting references.
- Mirror position, clearances and fixing coordination.
- Exposed faces, profiles and pattern orientation.
- Joint locations, backing and installation responsibilities.
Select representative samples from the VeraMarbles marble collection and review them against the surrounding finishes.
VeraMarbles provides natural-stone project support, including drawing review, sample coordination, shop-drawing coordination and quality checks. Share the complete vanity elevation with the stone schedule so the backsplash can be reviewed in context.
Frequently Asked Questions
Does a bathroom vanity always need a separate backsplash?
The wall behind the basin needs a suitable finish for its exposure, but that finish may already be provided by another wall system. Review the countertop junction and splash area before adding a separate stone strip.
Should the side splash match the rear backsplash height?
Matching heights can create a continuous line. Different heights can also work when their junction is deliberately detailed. Draw both elevations and the inside corner before choosing.
Can a backsplash be added after the countertop is installed?
It may be possible, subject to the existing dimensions, wall condition, fittings and joint arrangement. Verify these on site before fabricating the new pieces.
Must the backsplash come from the same slab as the countertop?
No. Using the same slab can help coordinate colour and pattern, but the actual cutting layout determines the relationship. If using different slabs, approve the pieces together.