
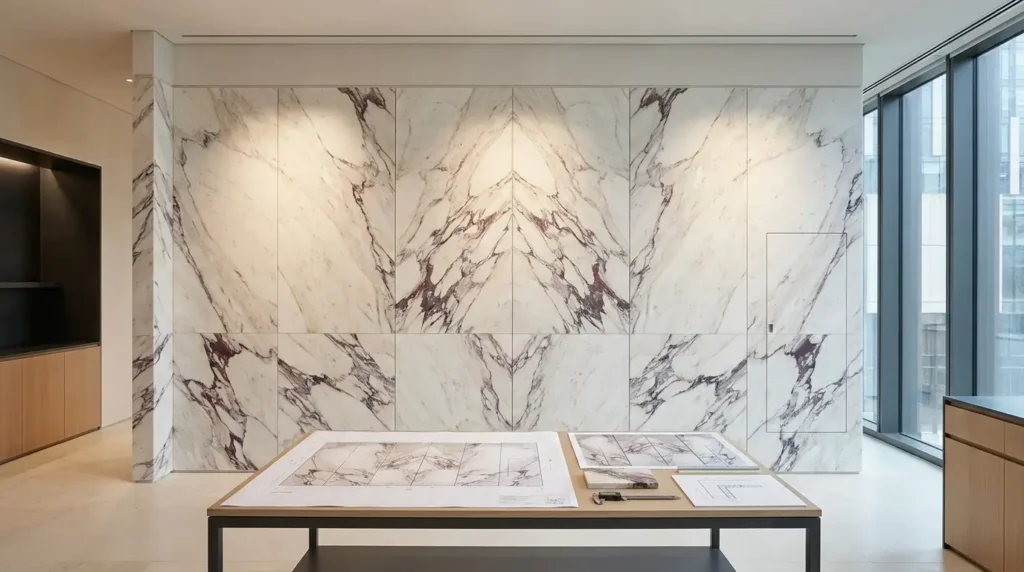
Marble wall cladding is often designed too late.
The stone may already be selected.
The render may already show:
one seamless dramatic marble wall.
But the technical elevation has not yet resolved:
- panel dimensions
- slab limitations
- joints
- corners
- openings
- access panels
- sockets
- wall lights
- returns
- fixing zones
- substrate
- movement
- installation sequence
At that point, the design team discovers something important:
a marble wall is not one image.
It is a collection of real stone panels that must fit:
the slab
the architecture
and
the installation system
at the same time.
Good marble wall cladding therefore begins with panelization.
The architect should treat the wall elevation as a coordination drawing rather than decorative background.
Every panel should have a reason for being:
- that size
- in that position
- with that joint
- from that part of the slab.
This guide explains how architects can plan marble and natural-stone wall cladding more effectively from early design through slab selection, shop drawings, fabrication and installation.
Start with the Wall Elevation
The primary drawing for an important marble wall should be a coordinated elevation.
Not only a render.
Not only a slab photograph.
Not only a finish schedule.
The elevation should establish the relationship between the stone and:
- floor level
- ceiling
- doors
- lift openings
- niches
- lighting
- sockets
- screens
- furniture
- access panels
- adjacent materials
- corners
- reveals
before the stone is cut.
A Render Communicates Intent
A render is useful for showing:
- material mood
- color
- general scale
- bookmatch concept
- overall visual composition
But it usually does not control:
- exact panel dimensions
- finished joint width
- edge returns
- cut-out positions
- tolerances
- fixing interfaces
These need technical drawings.
The Elevation Should Become the Control Geometry
For important walls, establish:
- finished floor datum
- finished ceiling datum
- wall limits
- centerlines
- openings
- architectural axes
Then build the panel grid around them.
This is more reliable than dividing the wall into attractive rectangles first and trying to force openings into the grid later.
Panel Size Is Not a Universal Standard
There is no single correct marble wall panel size.
Panel dimensions depend on:
- available slab dimensions
- stone type
- stone properties
- thickness
- installation method
- support system
- handling
- building access
- wall height
- joints
- project geometry
A panel that works on one interior wall may be inappropriate on another.
Do Not Ask Only: “What Is the Maximum Panel Size?”
The largest technically possible panel is not automatically the best panel.
A larger panel may provide:
- fewer joints
- stronger slab expression
but it may also create:
- lower material yield
- greater weight
- more difficult handling
- more complicated installation
- larger replacement risk
Panel size should optimize the complete project.
Start with Available Slab Dimensions
If the marble is supplied as slabs, the panel layout should respond to the actual usable slab size.
Suppose the design requires several very tall panels.
Before freezing the elevation, confirm:
- typical current slab height
- usable width
- edge losses
- natural features
- required trimming
A nominal slab dimension is not always equal to usable finished panel dimensions.
Raw Slab Size vs Usable Panel Size
A slab may include:
- irregular edges
- fissures
- repairs
- mesh
- resin areas
- edge damage
that reduce the usable cutting envelope.
Therefore:
slab size ≠ guaranteed finished panel size.
Large-format designs should be checked against actual material.
Panel Size Should Follow Stone Yield
Imagine a wall that can be divided in two ways.
Option A
Six extremely large panels.
Option B
Eight slightly smaller panels.
Option A may produce:
- fewer joints
- stronger visual impact
but require several slabs with poor yield.
Option B may:
- use the slabs more efficiently
- reduce waste
- simplify handling
while still creating a refined wall.
The correct answer depends on the architectural priority.
Use Panelization to Control Scale
Panel joints influence how large a wall feels.
Large panels can create:
- monolithic appearance
- stronger vein continuity
- fewer interruptions
Smaller panels can create:
- finer rhythm
- more manageable installation
- greater tolerance for slab limitations
Neither is inherently more luxurious.
Design the Joint Grid with the Architecture
A marble wall joint grid should relate to:
- door heads
- ceiling lines
- furniture
- screens
- architectural axes
- wall lighting
A random joint stopping a few centimeters below a door head often looks accidental.
A joint aligned with a major architectural datum can appear intentional.
Joint Location Is More Important Than Joint Count
The design objective should not always be:
minimum number of joints.
A better objective is:
well-positioned joints.
One additional joint placed correctly can sometimes produce a more coherent wall than a larger panel arrangement with awkward cut-outs.
Use Symmetry Carefully
A central wall may benefit from:
- equal side panels
- centered bookmatch
- balanced joint positions
But not every wall needs symmetry.
An asymmetrical architectural composition may work better with:
- directional slab flow
- offset panel rhythm
The panel grid should respond to the architecture rather than automatically centering everything.
Start with Openings
Before completing the panel layout, identify all penetrations.
These can include:
- doors
- lift doors
- television screens
- access hatches
- ventilation grilles
- wall lights
- sockets
- controls
- signage
- niches
Treat them as part of the panelization.
Avoid Tiny Stone Fragments Around Openings
Poorly coordinated panel grids can produce narrow strips beside:
- door frames
- access panels
- niches
These pieces may look visually weak and can complicate fabrication.
Where possible, revise the panel grid so openings are integrated into more balanced stone pieces.
Coordinate Services Early
A socket that moves:
80 mm
after slab mapping may affect:
- one panel
- a neighboring panel
- vein continuity
- cut-out reinforcement
- bookmatch alignment
Service coordination is therefore directly connected to stone design.
Freeze Critical Openings Before Cutting
Before releasing production, confirm critical dimensions for:
- electrical items
- lighting
- screens
- niches
- access panels
Whenever possible.
Late changes can require recutting or abandoning already mapped panels.
Marble Wall Joint Width
There is no universal joint width appropriate to every marble wall.
Joint design depends on:
- panel dimensions
- tolerances
- installation method
- substrate
- movement
- edge quality
- design intent
- applicable requirements
Do not simply specify:
“minimum possible joint.”
The joint must still accommodate the actual system.
Extremely Tight Joints Can Create Problems
A visually minimal joint may appear attractive in a render.
But insufficient allowance can make it difficult to accommodate:
- dimensional variation
- substrate tolerance
- installation adjustment
- movement
A slightly wider but consistent joint often looks more intentional than an irregular ultra-tight joint.
Joint Consistency Matters
Users notice inconsistent joints quickly.
Especially on:
- polished marble
- dark stone
- bookmatched walls
- strongly lit surfaces
The specification should define the intended joint character and allowable fabrication/installation tolerance.
Grouted Joint vs Sealant Joint vs Open Joint
Different systems may use different joint treatments.
Depending on the application and installation system, a wall may use:
- grout
- flexible sealant
- shadow/open joint
- decorative profile
These are not interchangeable decorative choices.
The correct solution should follow:
- installation method
- movement requirement
- substrate
- environment
and the complete wall system.
Do Not Bridge Required Movement Joints
If the substrate or building requires movement accommodation, the stone finish should not simply conceal it with rigid material.
Required movement joints need to continue through or be appropriately coordinated with the finish system.
The panel layout should acknowledge them.
Use Movement Joints as Part of the Elevation
A required joint does not necessarily need to ruin the design.
It can sometimes align with:
- panel joints
- material transitions
- architectural reveals
if coordinated early.
Technical necessity can become architectural order.
Interior Marble Walls Can Use Different Installation Strategies
Interior marble veneer may be developed using:
- adhesively attached systems
- mechanically supported systems
- hybrid or engineered systems
depending on the application.
The correct approach depends on factors such as:
- panel size
- stone weight
- thickness
- wall height
- substrate
- environment
- code
- stone characteristics
The architect should avoid assuming one fixing method works for every stone wall.
Adhesively Attached Interior Panels
Adhesive systems can be appropriate for certain interior natural-stone installations when the:
- panel
- substrate
- stone
- adhesive
- installation conditions
are compatible.
The design team should verify the proposed system rather than specifying a generic adhesive by habit.
Substrate Is Part of the Wall System
The marble is only the finish layer.
The design should understand what sits behind it.
Possible substrates or support assemblies may include:
- concrete
- masonry
- cementitious boards
- engineered framing systems
- other approved assemblies
depending on the project.
The selected substrate must be appropriate for:
- stone weight
- fixing
- flatness
- environment
Flatness Matters
Large polished or honed marble panels can reveal wall irregularity.
Poor substrate flatness may result in:
- uneven panels
- lippage
- varying joints
- visible waves
The bigger the panel, the more important substrate preparation can become.
Adhesive Should Not Become a Leveling Strategy
Do not assume large substrate errors can be corrected simply by applying more bonding material behind individual panels.
The substrate should be prepared to the requirements of the installation system.
Panel setting should refine the installation, not rescue poor construction geometry.
Mechanical Support
Larger, heavier or more demanding installations may require mechanically supported or engineered attachment systems.
These can transfer:
- dead load
- applied loads
through a designed attachment arrangement rather than relying solely on surface adhesion.
The actual system should be designed according to the project.
Do Not Design Anchor Positions After Fabrication
Where mechanical support is required, the panel drawing should coordinate:
- fixing zones
- kerfs
- holes
- edge distances
- panel geometry
- subframe or structure
before stone production.
Anchor preparation is part of fabrication.
Stone and Fixing System Must Be Compatible
Different stones can behave differently around:
- anchor holes
- kerfs
- local loads
The panel design should consider the actual material’s tested properties and fabrication characteristics.
Do not copy an anchoring detail from another stone without evaluation.
Exterior Marble Cladding Is a Different Engineering Category
An interior feature wall and an exterior facade may look similar in elevation.
Technically, they are not the same system.
Exterior cladding must consider factors such as:
- dead load
- wind
- seismic actions where applicable
- moisture
- thermal movement
- support structure
- anchorage
- panel testing
- building code
A visually successful interior panel detail should not simply be transferred outdoors.
Exterior Panel Dimensions Should Be Engineered
For exterior applications, panel:
- length
- width
- thickness
- anchor position
interact with:
- stone strength
- loads
- support conditions
The largest quarry slab does not establish the largest safe facade panel.
Engineering should.
Wall Height Changes the Design Problem
A 2.4-meter residential feature wall and a multi-story lobby wall are different cladding conditions.
As wall height increases, consider:
- installation sequence
- access
- lifting
- support
- panel handling
- joint accumulation
earlier in the design process.
Full-Height Panels
A full-height marble panel can create a striking interior.
But verify:
- actual slab height
- usable finished dimension
- transport
- elevator access
- door access
- installation clearance
- lifting equipment
before approving the concept.
A Panel May Fit the Wall but Not Reach the Wall
This is one of the easiest problems to miss.
A 3-meter panel may fit beautifully in the elevation.
But can it pass through:
- site entrance
- corridor
- lift
- stairwell
- doorway?
Site logistics should influence panelization before fabrication.
Panel Weight Matters
Natural stone is heavy.
As panel size and thickness increase, so do:
- handling demands
- lifting requirements
- attachment loads
- installation risk
Do not optimize only for fewer joints.
Thickness Must Be Project-Specific
There is no universal marble wall thickness suitable for all cladding.
Thickness depends on:
- stone
- panel size
- attachment system
- application
- fabrication
- support
- loading
- code
The architect should avoid copying a thickness note from another project without validating it.
Composite or Reinforced Systems Are Separate Products
Some projects may use natural stone combined with:
- reinforcement
- backing
- composite panels
- engineered substrates
to achieve specific weight, size or performance objectives.
These systems should be specified as distinct assemblies.
Do not treat a reinforced composite panel as equivalent to a conventional solid dimension-stone panel.
Slab Selection Should Follow Panelization
A common mistake is:
- approve beautiful slabs
- then determine panel sizes.
A better process is often:
- establish wall geometry
- create preliminary panelization
- understand required panel dimensions
- review suitable slabs
- map the panels.
This ensures the selected slabs can actually produce the intended wall.
Full-Slab Photography
For visually important walls, photograph the complete slabs clearly.
The photographs should allow the project team to evaluate:
- vein movement
- color
- natural features
- dimensions
- neighboring slab relationships
Good slab photography becomes the basis for digital layout.
Sequential Slabs
If the wall requires:
- bookmatch
- continuous flow
- controlled transitions
sequential slabs may be especially valuable.
Confirm availability before finalizing the design.
Not every group of attractive slabs can produce a coherent bookmatch.
Bookmatched Marble Walls
Bookmatching creates a mirrored composition from sequential stone faces.
Possible configurations include:
- two-panel bookmatch
- four-panel composition
- larger repeated mirrored arrangements
The design can be powerful.
But bookmatching should be planned before cutting.
Bookmatch Starts at Slab Selection
A bookmatch cannot be guaranteed by writing:
“bookmatched marble wall”
in the finish schedule.
The process requires:
- suitable sequential slabs
- appropriate cut faces
- compatible dimensions
- panel grid
- approved layout
The natural stone determines what is possible.
Two-Way Bookmatch
Two adjacent slabs mirror each other around a central joint.
The central joint becomes a major architectural axis.
Coordinate it with:
- wall centerline
- furniture
- fireplace
- screen
- reception desk
where appropriate.
Four-Way Bookmatch
Four panels can create a mirrored composition around horizontal and vertical axes.
This can produce a dramatic image.
But the geometry must fit:
- wall dimensions
- slab dimensions
- openings
before production.
Do Not Force Bookmatch Around Openings
A perfectly centered four-way composition may be visually strong on a blank wall.
Add:
- television
- door
- niche
and the same composition may become awkward.
The stone layout should respond to the actual elevation.
Continuous Vein Flow
Bookmatching is not the only premium strategy.
Another approach is arranging panels so natural movement flows directionally across the wall.
This can appear:
- calmer
- less symmetrical
- more geological
than mirror layouts.
Random Layout
A controlled random arrangement may work well with:
- calm marble
- homogeneous stone
- smaller modules
The key word is:
controlled.
Random should not mean:
install whatever comes out of the crate next.
Slab Mapping
Once the slabs and panel geometry are known, place the panels digitally over the actual slab images.
A useful process is:
- photograph each slab
- record slab dimensions
- scale the image
- draw the required panel shapes
- position them
- review vein movement
- check natural features
- calculate yield
- approve the map
- issue for fabrication
This protects both:
- visual intent
- material utilization.
Design Around the Panel Joint
During slab mapping, include the real joint.
Do not compose panels as if they touch perfectly.
Even a small physical separation can alter:
- bookmatch
- vein continuation
- symmetry
The digital layout should represent the intended installed geometry.
Include Openings in Slab Mapping
Before approving the layout, overlay:
- sockets
- switches
- niches
- screens
- access panels
where their position affects the stone.
Otherwise an important vein may disappear into an opening.
Slab Mapping and Yield Must Be Balanced
The most visually attractive layout may create significant material waste.
The most efficient layout may weaken the composition.
For every major wall, decide whether the priority is:
- maximum yield
- maximum visual control
- balanced optimization
A hotel lobby feature wall may justify a different approach from secondary corridor cladding.
Dry Lay
Dry laying means arranging fabricated panels before installation or shipment to review their relationship.
It can be especially valuable for:
- bookmatch
- dramatic stone
- continuous vein flow
- major public walls
- complex corners
Not every wall requires full dry lay.
When Representative Review May Be Enough
A large wall using:
- uniform limestone
- repetitive small modules
may not require every panel to be laid out.
Instead, representative material review may be sufficient depending on project requirements.
Approval effort should match visual risk.
Photograph the Dry Lay
For remote architectural review, photograph:
- complete elevation
- panel codes
- important joints
- corners
- natural features
under controlled lighting.
The goal is to evaluate the wall, not create a glamorous stone photograph.
Number Every Panel
Once an important layout is approved, each panel should have a unique identity.
For example:
W01-P01
W01-P02
W01-P03
The numbering system can connect:
- elevation
- shop drawing
- slab map
- dry lay
- panel
- crate
- installation position.
Panel Codes Should Survive the Entire Workflow
Do not create one numbering system in the factory and another on site.
Use one consistent logic wherever practical.
This reduces installation mistakes.
Corners Are Part of the Marble Composition
An external corner can be detailed several ways.
Possible concepts include:
- mitred corner
- butt joint
- stone return
- contrasting trim
- recessed joint
The correct strategy depends on:
- design
- stone
- edge exposure
- fabrication
- durability
Mitred Marble Corners
A mitred corner can create a more monolithic appearance because the stone visually wraps around the return.
For strongly veined marble, the fabricator may also attempt to coordinate the pattern around the corner.
This requires planning during slab layout.
Mitering Does Not Automatically Create Perfect Vein Continuity
The visible top and return come from different cut faces or pieces.
Perfect geological continuity should not be assumed.
The objective is controlled visual relationship.
Butt-Jointed Corners
A simpler butt joint may be appropriate in some architectural conditions.
If used, decide:
- which edge is visible
- which panel terminates
- joint location
- edge finish
before fabrication.
Deep Returns
Doors, niches and wall openings may require stone returns.
Return depth affects material use and layout.
Coordinate:
- face panel
- jamb
- head
- sill
as one architectural detail.
Lift Surrounds
Lift surrounds are particularly sensitive because they combine:
- stone
- metal frames
- repeated openings
- joint grids
- signage
- call buttons
Align marble panelization with the lift geometry early.
A few millimeters of frame change can affect several pieces.
Door Reveals
Door openings should identify:
- finished opening
- frame position
- reveal depth
- joint
- stone return
- adjacent finish
Do not fabricate jamb pieces from nominal structural dimensions if final frame geometry controls the stone.
Access Panels
Access should not be treated as an afterthought.
Where a stone-clad wall requires maintenance access, the design should coordinate:
- access panel dimensions
- joint perimeter
- opening method
- stone facing
- hardware
- vein continuity
before production.
Hidden Access Panels
A concealed access panel can work well when its perimeter aligns with the marble panel grid.
Trying to hide an access door in the middle of one large panel can create unnecessary fabrication complexity.
Sockets and Switches
Small electrical openings can still damage a composition.
Where possible:
- align them consistently
- avoid major vein focal points
- avoid fragile panel corners
Coordinate actual faceplate dimensions.
Wall Lights
Lighting can influence both:
- panel layout
- stone appearance.
A fixture centered on a joint produces a very different detail from one centered on a stone panel.
Decide intentionally.
Grazing Light
Directional lighting can reveal:
- lippage
- uneven joints
- surface differences
- substrate waves
more strongly than diffuse light.
For walls designed with grazing light, fabrication and substrate tolerance become especially visible.
Consider a mock-up.
Polished vs Honed Marble Walls
Both can work effectively.
Polished
Can emphasize:
- color depth
- veins
- reflection
- dramatic slab movement
Honed
Can create:
- softer contrast
- lower reflection
- calmer architectural character
The finish should be approved on the actual stone.
Polished Walls and Lighting
Polished marble can reflect:
- windows
- pendant lights
- corridors
- furniture
The reflection becomes part of the architecture.
This should be considered intentionally.
Honed Walls
Honed stone generally produces less visual glare.
It can be particularly effective for:
- large lobby walls
- residential feature walls
- contemporary hospitality interiors
where the stone should feel material rather than mirror-like.
Fireplace Walls
Marble fireplace surrounds and feature walls require coordination with:
- fireplace system
- temperature exposure
- substrate
- clearances
- fixing
- joints
The stone supplier should not be expected to determine fireplace safety requirements independently of the approved fireplace assembly.
Media Walls
For television or media walls, coordinate:
- screen dimensions
- bracket
- ventilation
- access
- outlets
- cable routes
before stone cutting.
A future screen replacement strategy may also affect panel design.
Bathroom Wall Cladding
Marble bathroom walls require additional coordination with:
- waterproofing
- substrate
- shower fixtures
- niches
- glass
- sealant
- penetrations
The stone is not the waterproofing layer.
Large Bathroom Panels
Large panels can reduce:
- visible joints
- grout lines
and preserve slab movement.
But they also require:
- appropriate handling
- substrate preparation
- access
- installation planning.
Shower Niches
Coordinate:
- back
- sides
- head
- sill
- external wall field
before slab mapping.
A niche can become part of the vein composition rather than simply a rectangular hole cut through it.
Wet-Area Joint Treatment
Joints in wet areas should be designed as part of the complete waterproofing and sealant system.
Do not simply apply the same joint treatment used on a dry lobby feature wall.
Shop Drawings Are Essential for Custom Marble Walls
For significant walls, shop drawings should translate the design into fabrication information.
They may include:
- elevation
- panel grid
- panel codes
- finished dimensions
- joint width
- stone
- finish
- thickness
- visible face
- vein direction
- openings
- returns
- corner detail
- edge profile
- fixing zones
- sections
The shop drawing should become the production reference.
Draw Sections Where the Wall Changes Depth
Elevations are not enough for:
- corners
- reveals
- niches
- wall build-ups
- material transitions
- soffits
Use sections to communicate how the stone interfaces with adjacent construction.
Show the Visible Face
For complex panels, identify which surface is:
- visible
- return
- concealed
especially where fabrication includes mitres or multiple pieces.
This reduces errors.
Revision Control Matters
Stone fabrication is difficult to reverse.
The production team should work from one controlled approved drawing set.
If:
- screen location
- niche size
- access panel
changes, the update should return to the coordinated drawing.
Do not rely on scattered message corrections.
Use Hold Points
For important marble walls, useful production hold points can include:
wall geometry confirmed
→
slabs approved
→
shop drawings approved
→
slab layout approved
→
fabrication released.
Once cutting begins, changes become more expensive.
Dimensional Verification
Before fabrication, determine whether dimensions come from:
- design drawings
- verified site measurements
- approved frame dimensions
- finished conditions
Do not simply write:
“verify on site”
without assigning who controls the final measurements.
Shop Drawing vs Site Measurement
The drawing defines the intended geometry.
Site measurement confirms the real construction.
When the two differ, the issue should be resolved before fabrication.
Tolerances Accumulate
A wall may contain:
- ten panels
- eleven joints
Small dimensional deviations can accumulate across the elevation.
Therefore, the setting-out strategy should include:
- control datum
- overall wall dimension
- panel dimensions
- joint allowances
rather than treating each panel independently.
Start from a Defined Datum
Useful datums may include:
- wall centerline
- finished floor level
- door center
- structural opening
- finished wall edge
The installer needs to know where the panel sequence begins.
Do Not Let the Last Panel Absorb All Error
A poor layout may set every panel from one edge without controlling the overall dimension.
The final panel then becomes:
- unusually narrow
- oversized
- incorrectly jointed.
Distribute tolerances through planned setting-out.
Quality Control Should Check More Than Appearance
Visual inspection should review:
- stone selection
- finish
- veins
- repairs
- chips
- scratches
- staining
- panel sequence
Dimensional inspection should review:
- length
- width
- thickness
- squareness
- edge profile
- openings
- fixing preparation
- returns.
Inspect the Back of the Panel
The front may look perfect while the back contains features important to installation.
Depending on the system, inspect:
- reinforcement
- mesh
- resin
- fixing preparation
- identification
- cleanliness
where relevant.
Check Cut-Out Corners
Openings can create stress concentration.
Review:
- socket cut-outs
- access openings
- niches
- large rectangular holes
according to the stone and fabrication design.
Avoid assuming every cut-out can be placed anywhere in the slab.
Pre-Shipment Wall Review
For a high-value feature wall, the design team may request:
- dry-lay photograph
- panel measurements
- finish review
- panel-code verification
- crate plan
before shipment.
This creates a final checkpoint.
Packing Should Follow Installation Logic
Panels should not be packed only according to factory convenience.
Where practical, packing should consider:
- installation area
- panel sequence
- size
- access
especially for numbered feature walls.
Crate Identification
A crate can identify:
- wall reference
- panel range
- sequence
- project area
so site teams do not need to open every package searching for one panel.
Protect Finished Edges
Mitred corners and polished edges can be more vulnerable during shipping.
Packing design should account for:
- edge exposure
- vibration
- panel weight
- internal movement.
Installation Sequence
A panelized wall should have a planned installation sequence.
This may follow:
- bottom to top
- center outward
- bookmatch axis
- numbered elevation
depending on the system.
The sequence should preserve the approved slab composition.
Bookmatched Wall Installation
For a centered bookmatch, installation may be planned around the central axis so the key composition is controlled first.
The actual sequence should still follow the approved installation system.
Do Not Randomly Swap Similar Panels
Two marble panels may have almost identical dimensions.
That does not mean they are visually interchangeable.
If slab mapping was approved, changing panel positions may destroy:
- bookmatch
- flow
- color balance.
Panel codes should be respected.
Spare Panels
For significant projects, consider retaining spare stone or panels.
This is especially useful when the wall uses:
- unusual marble
- tightly controlled selection
- custom finish
because future quarry production may differ.
Replacement Strategy
Ask:
If panel P08 breaks five years from now, what happens?
Possible strategies include:
- spare finished panel
- spare slab
- retained raw material
- documented slab layout
The importance depends on the wall and project.
Architect’s Marble Wall Cladding Checklist
Before releasing a marble wall for production, confirm:
Architecture
- wall limits
- finished floor datum
- ceiling datum
- openings
- doors
- lifts
- niches
- access panels
- services
- lighting
Material
- exact marble
- finish
- visual range
- full slabs
- sequential availability where required
Panels
- panel grid
- finished dimensions
- thickness
- joints
- panel codes
- vein direction
Details
- external corners
- internal corners
- returns
- reveals
- edges
- cut-outs
- transitions
- movement conditions
Installation
- substrate
- adhesive or mechanical system
- fixing interfaces
- support
- wall flatness
- wet-area requirements where relevant
Visual Layout
- bookmatch
- continuous flow
- random distribution
- slab mapping
- dry lay
Documentation
- shop drawings
- sections
- slab map
- panel schedule
- opening schedule
- revision status
Production
- cutting
- edge fabrication
- reinforcement where specified
- fixing preparation
- panel numbering
Quality Control
- visual selection
- dimensions
- finish
- joints
- edge quality
- cut-outs
- panel sequence
Logistics
- panel weight
- building access
- lifting
- packing
- crate sequence
- installation order
- spare material
Not every wall requires every item.
But an important wall should never rely only on a render and a stone sample.
Questions Architects Should Ask Before Approving a Marble Wall
- What are the current usable slab dimensions?
- Can the proposed panel sizes be produced efficiently?
- What panel thickness is appropriate for the actual system?
- What installation method is proposed?
- What substrate does that method require?
- What joint character is realistic?
- Are movement joints required?
- Are sequential slabs available?
- Can the selected slabs support the proposed bookmatch?
- Can we review full-slab photographs?
- Can a digital slab map be prepared?
- Can openings be included in the map?
- Can major corners be vein coordinated?
- Is full dry lay required?
- How will the panels be numbered?
- What shop drawings are required?
- Which dimensions must be verified on site?
- What fixing preparation is required in the factory?
- How will finished panels be inspected?
- How will panels be packed according to installation sequence?
These questions move the specification from:
“We want this marble on this wall.”
to:
“We know how this exact marble wall will be fabricated and installed.”
Common Marble Wall Cladding Mistakes
Selecting Slabs Before Panelizing the Wall
The approved slabs may not produce the required dimensions efficiently.
Designing Only from a Render
Renders do not resolve construction geometry.
Using the Largest Possible Panels Everywhere
Large panels can create handling and yield problems.
Specifying the Minimum Possible Joint
The wall still needs tolerance and movement accommodation.
Ignoring Required Movement Joints
The marble finish must coordinate with the building assembly.
Finalizing Bookmatch Too Late
Sequential slabs may no longer be available.
Ignoring Openings During Slab Layout
Important veins can disappear inside cut-outs.
Moving Services After Slab Mapping
Small changes may affect several panels.
Leaving Corners to the Fabricator
Corner strategy is part of the architecture.
Assuming Interior and Exterior Cladding Use the Same Detail
Exterior systems require separate engineering.
Ignoring Site Access
Large panels may be impossible to deliver into the room.
Treating Panel Thickness as an Aesthetic Choice Only
Thickness interacts with stone, dimensions and support.
Ignoring the Substrate
Large marble panels cannot correct an unsuitable wall assembly.
Mixing Panel Codes on Site
The approved visual layout can be lost.
Packing Without Installation Logic
Correct panels may arrive but be difficult to access in sequence.
A Practical Marble Wall Workflow
1. Define the Wall
Finalize overall architecture and major openings.
2. Select the Material Direction
Choose marble character and finish.
3. Check Current Slab Availability
Understand usable dimensions and quantity.
4. Develop Preliminary Panelization
Coordinate with architecture.
5. Select the Installation Strategy
Adhesive, mechanical or another engineered assembly as appropriate.
6. Refine Panel Dimensions
Based on slab, support and handling.
7. Coordinate Joints
Include movement conditions.
8. Resolve Corners and Reveals
Do not leave them until fabrication.
9. Freeze Critical Openings
Electrical, lighting and access.
10. Review Actual Slabs
Select the required sequence.
11. Produce Shop Drawings
Panel grid, sections, details and codes.
12. Prepare the Slab Map
Position each panel.
13. Approve the Visual Layout
Bookmatch, flow or controlled distribution.
14. Release Fabrication
Only after critical approvals.
15. Dry Lay Where Required
Especially major feature walls.
16. Inspect
Visual and dimensional quality.
17. Number and Pack
According to the elevation.
18. Install
Following the approved sequence.
This process preserves the design all the way from:
slab
to
finished wall.
Final Thoughts
A marble wall should not be designed as one giant image.
It should be designed as a coordinated system of real stone panels.
The best results connect:
wall geometry
slab dimensions
panel grid
joints
stone movement
corners
openings
support
fabrication
installation.
There is no universal ideal panel size.
There is no universal ideal thickness.
There is no universal minimum joint that should be copied from project to project.
These decisions depend on:
- the actual marble
- the actual wall
- the actual support system
- the actual site.
Start with a coordinated elevation.
Check slab sizes before freezing large panels.
Design joints with the architecture.
Resolve movement conditions.
Decide whether the visual strategy is:
- bookmatch
- continuous flow
- controlled random layout.
Map panels over real slabs.
Include all openings.
Resolve corners before cutting.
Use shop drawings.
Assign unique panel numbers.
Dry lay the wall when the visual risk justifies it.
Inspect dimensions as carefully as stone color.
Pack according to installation logic.
And ensure the wall installed on site corresponds to the composition approved during design.
That is the difference between:
putting marble on a wall
and
designing marble wall cladding.
Frequently Asked Questions
What is the best panel size for marble wall cladding?
There is no universal best size. Panel dimensions should be determined from the actual stone, slab dimensions, thickness, support system, wall geometry, handling and installation requirements.
Should marble wall panels be as large as possible?
Not necessarily. Larger panels reduce joints but can increase weight, waste, handling difficulty and replacement risk. Panel size should balance appearance, material yield and technical requirements.
What is the standard joint width for marble wall panels?
There is no single universal joint width suitable for every wall. Joint width depends on panel tolerance, installation system, substrate, movement requirements and design intent.
Can marble wall panels be installed with adhesive?
Certain interior stone veneer installations can use compatible adhesive systems when the stone, substrate, panel size and installation conditions are appropriate. Larger or more demanding installations may require another support strategy.
When is mechanical support required for marble wall cladding?
The requirement depends on factors such as panel size, stone weight, height, application, stone properties and project conditions. The attachment system should be designed for the actual wall.
Can the same marble wall detail be used outdoors?
No assumption should be made. Exterior cladding has additional structural and environmental requirements and needs project-specific engineering.
How thick should a marble wall panel be?
There is no universal thickness. Thickness should be established according to stone type, panel dimensions, fabrication, attachment system, loading and applicable requirements.
Should architects approve full marble slabs for a feature wall?
For highly expressive walls, full-slab review can be extremely useful because a small sample cannot communicate slab-scale pattern or bookmatching potential.
What is a bookmatched marble wall?
Bookmatching uses sequential stone faces arranged to create mirrored natural patterns across adjacent panels.
Is bookmatching always better?
No. Some stone works more effectively with continuous directional flow or controlled natural distribution rather than mirrored symmetry.
What is slab mapping?
Slab mapping digitally places the required wall panels over photographs of the actual selected slabs before cutting to control vein position, joints and material yield.
Should sockets and openings be shown during slab mapping?
Yes, where they affect visible stone. This prevents important geological features from being unintentionally removed by cut-outs.
Should marble wall panels be dry laid?
Dry layout can be especially useful for bookmatched, highly veined or important public feature walls. Simpler uniform walls may require only representative review.
Why should marble wall panels be numbered?
Numbering preserves the approved layout through fabrication, packing and installation.
How should external marble corners be detailed?
Possible strategies include mitred corners, butt joints, stone returns or designed profiles. The detail should be chosen according to stone, fabrication, durability and architectural intent.
Can marble wall panels wrap around corners with continuous veins?
Visual coordination may be possible through careful slab layout and fabrication, but perfect geological continuity should not be assumed.
Do bathroom marble walls need waterproofing?
The marble itself is not the waterproofing layer. Wet-area walls require an appropriate complete waterproofing and installation system.
Should architects retain spare marble panels?
For important walls, retaining spare material may be useful because later quarry production can differ from the original stone selection.
Developing a Marble Wall Cladding Package?
VeraMarbles supports architects and interior designers developing natural-stone wall systems for residential, hospitality and commercial projects.
Send us your:
- wall elevations
- sections
- project dimensions
- stone direction
- required finish
- estimated quantity
- openings
- reference render
- preferred panel strategy
- project location
- schedule
We can support your project with:
- marble selection
- full-slab review
- panel-size coordination
- cut-to-size production
- bookmatch development
- continuous vein layouts
- slab mapping
- corner coordination
- custom returns
- shop-drawing coordination
- panel numbering
- dry layout
- dimensional quality control
- visual inspection
- export packing
- installation-sequence coordination
Request Marble Wall Specification Support from VeraMarbles