
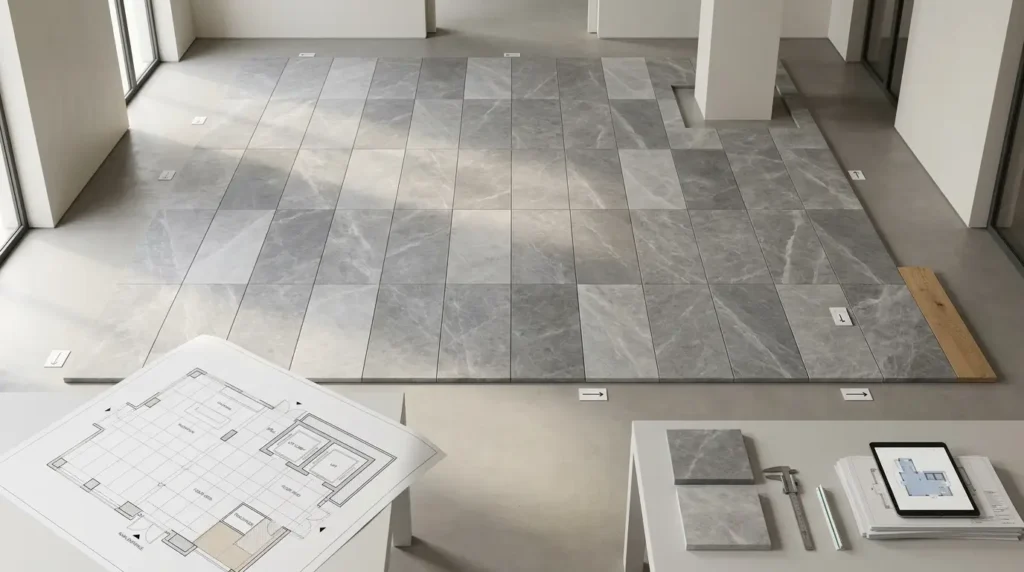
A marble floor should not begin with:
“600 × 600 marble, honed.”
That describes a material format.
It does not design the floor.
A natural-stone floor is an architectural field composed of:
- stone
- module
- joints
- direction
- transitions
- movement accommodation
- openings
- thresholds
- stairs
- furniture
- lighting
- tonal variation
- installation sequence
The larger the floor becomes, the more important these relationships become.
A 4 m² residential bathroom can tolerate decisions that may become visually unacceptable across a 600 m² hotel lobby.
For architects, the objective should therefore be to design:
the floor as a complete composition
rather than selecting individual marble tiles.
This guide explains how to coordinate marble flooring from early module selection through dry layout, production, packing and installation.
Start with the Architecture, Not the Tile Size
Before choosing:
600 × 600 mm
or
600 × 1200 mm,
study the space.
Identify:
- main entrance
- circulation axis
- reception
- lift lobby
- doors
- columns
- stairs
- thresholds
- furniture
- major walls
- room centerlines
- changes in material
The floor grid should respond to these elements.
A technically correct module can still produce poor architecture if the joints are unrelated to the room.
The Floor Grid Is an Architectural Drawing
Treat the stone-floor layout like:
- reflected ceiling plan
- facade grid
- wall panel elevation
rather than a finish hatch.
The drawing should show where the joints actually go.
Important floor areas deserve a true setting-out plan.
Establish the Primary Axis
Most spaces have a dominant direction.
It may be:
- entrance to reception
- entrance to lifts
- long corridor
- main lobby axis
- central room line
- major architectural wall
Use that axis to establish the floor grid where appropriate.
Do Not Automatically Start from One Wall
Starting installation at the nearest wall can create:
- narrow cuts on the opposite side
- misaligned doorways
- asymmetric borders
- awkward lobby geometry
The setting-out point should follow the architecture, not installer convenience.
Centerline Layout
A symmetrical room may benefit from setting the floor from:
- room center
- entrance axis
- reception center
so cuts at opposite edges are balanced.
This can be particularly useful in:
- formal lobbies
- lift halls
- entrance galleries
- symmetrical bathrooms
But symmetry is not mandatory.
Asymmetrical Architecture
Contemporary spaces may have:
- offset reception desks
- irregular columns
- curved walls
- multiple circulation paths
In these situations, forcing a centered tile grid may look artificial.
The layout should respond to the most important architectural elements.
Marble Floor Tile Size
There is no universal best marble floor format.
Useful project modules may include:
- 300 × 300 mm
- 300 × 600 mm
- 400 × 400 mm
- 400 × 800 mm
- 600 × 600 mm
- 600 × 1200 mm
- 800 × 800 mm
- larger custom cut-to-size formats
depending on:
- stone
- slab dimensions
- architecture
- thickness
- substrate
- installation system
- project scale
The dimensions should be coordinated rather than selected because they appear in a catalogue.
600 × 600 Marble Flooring
A square 600 × 600 mm module can provide:
- regular grid
- easy directional neutrality
- balanced proportions
- flexible use across medium and large rooms
It can work well where the design requires:
- repetition
- controlled variation
- less emphasis on one direction
But the square grid will still be visible.
Its relationship to the room needs to be intentional.
600 × 1200 Marble Flooring
A 600 × 1200 mm rectangular format introduces a stronger directional character.
It can emphasize:
- length
- movement
- circulation
- scale
This can be particularly useful in:
- hotel lobbies
- corridors
- large residential interiors
- retail spaces
But direction becomes much more important.
Long Direction Parallel to Circulation
Running the 1200 mm dimension along the principal circulation direction can visually reinforce movement through the space.
This can create a longer, calmer field.
Long Direction Across Circulation
Rotating the same module 90 degrees can create:
- stronger cross rhythm
- more frequent joints along the walking direction
- different perceived proportions
Neither orientation is universally better.
The floor plan should decide.
Large-Format Marble Flooring
Larger stone pieces can reduce the number of visible joints and allow more of the natural marble pattern to remain intact.
This may create:
- greater visual continuity
- calmer surface
- larger architectural scale
But large format also increases demands related to:
- slab yield
- handling
- substrate preparation
- flatness
- installation
- packing
Large should not automatically mean better.
Large Format and Material Yield
A larger tile requires larger usable stone areas.
This can reduce the number of pieces obtainable from each slab.
If the marble contains:
- strong fissures
- concentrated veins
- natural features
the usable yield may decrease further.
Architectural scale and stone economics are directly connected.
Small Format Can Be Architecturally Strong
A smaller format can be appropriate where the design requires:
- traditional rhythm
- intricate patterns
- transitions
- smaller rooms
- detailed borders
The goal should not always be the minimum number of joints.
The goal is the correct scale for the architecture.
Tile Size Should Respond to Room Size
A 1200 mm tile inside a very small room may create:
- awkward cuts
- almost no visible repeat
while a small tile across a monumental lobby can create excessive visual noise.
Study actual full-scale repeat.
Do not judge the floor only from a 3D render.
Draw the Real Module in Plan
Instead of applying a generic material texture in rendering software, create the true:
- tile dimensions
- joint positions
- orientation
in the architectural floor plan.
This reveals problems earlier.
Vein Direction Is Part of Floor Design
Many marbles have directional geological movement.
The architect should decide whether the dominant veins should:
- follow circulation
- cross circulation
- run toward a focal point
- remain randomly distributed
- create controlled continuous flow
Do not leave this decision until installation.
Directional Marble
Some marble selections have strong linear movement.
For these stones, even square tiles can appear directional because the geological veins create an axis.
The drawing should identify the desired orientation.
Veins Along a Corridor
Running veins along the corridor can reinforce:
- length
- forward movement
- perspective
This often creates a calmer visual field.
Veins Across a Corridor
Running strong veins across circulation can create:
- rhythm
- interruption
- visual segmentation
This may be useful when a long corridor needs to feel shorter.
Diagonal Vein Orientation
A diagonal stone movement can make a rectangular room feel more dynamic.
But random diagonal changes between neighboring tiles may create visual disorder.
If diagonal movement is intentional, control it.
Vein Direction Arrows
For directional natural stone, floor shop drawings can include orientation arrows.
These can establish how each piece should be rotated.
The same information can then follow through:
- dry lay
- numbering
- packing
- installation
Random Does Not Mean Unplanned
Some floors should not show continuous vein alignment.
That does not mean the stone should be installed without review.
A controlled random floor can still balance:
- dark pieces
- light pieces
- strong veins
- calm pieces
across the complete field.
Tone Distribution Matters
Natural marble contains tonal variation.
Imagine a floor containing:
- 70 light tiles
- 20 medium tiles
- 10 darker tiles
If the darker tiles are installed together because they arrived in the same crate, the floor may develop a visible dark patch.
The same material distributed correctly may look balanced.
Control Natural Variation Rather Than Eliminating It
The objective should not be:
every tile must look identical.
That conflicts with genuine natural stone.
Instead define:
- acceptable color range
- acceptable vein intensity
- distribution strategy
Natural variation becomes part of the composition.
Range Approval
Before bulk production, architects can review representative pieces showing:
- lighter acceptable range
- typical range
- darker acceptable range
- stronger vein character
where appropriate.
This can communicate the expected natural envelope more effectively than one perfect sample.
Sample Does Not Represent the Complete Floor
A 300 × 300 mm sample cannot predict:
- overall tonal distribution
- large veins
- pattern density
- batch relationships
For significant flooring, review more representative material.
Batch Coordination
Large projects may need stones from:
- several slabs
- several blocks
- several production lots
The visual relationship between them should be reviewed.
Where consistency matters, coordinate material for the project as early as practical.
Do Not Assume Later Material Will Match Exactly
Natural stone production can change with:
- quarry level
- block
- time
- geological area
If the project will be delivered in phases, consider how material continuity will be managed.
Floor Grid and Doorways
Doorways are some of the most noticeable locations in a stone floor.
Avoid accidental conditions such as:
- 40 mm strip beside a door
- joint almost aligned with frame
- small triangular pieces
- unrelated grids between rooms
Coordinate door thresholds early.
Should Floor Joints Align Through Doorways?
Sometimes yes.
Sometimes no.
Possible approaches include:
- continue the same grid
- reset the grid in the next room
- introduce a threshold
- use a contrasting stone strip
The architectural relationship between spaces should determine the choice.
Thresholds Can Resolve Grid Changes
A threshold can create a deliberate break between:
- two marble layouts
- marble and timber
- marble and carpet
- marble and porcelain
This allows each space to use an appropriate floor grid without producing an accidental transition.
Threshold Width Should Be Designed
Do not allow the threshold to become the leftover gap between two floor systems.
Define:
- width
- stone
- direction
- level
- joint
as part of the detail.
Marble to Timber Transition
Natural stone and timber have different:
- thickness
- movement behavior
- installation systems
The detail should coordinate:
- finished level
- transition joint
- edge protection
- movement requirements
rather than focusing only on visual alignment.
Marble to Carpet Transition
In hospitality projects, lobby marble may meet:
- area rug
- inset carpet
- corridor carpet
The interface should consider:
- floor level
- carpet thickness
- edge detail
- cleaning
- rolling luggage
A beautiful marble layout can be weakened by a poorly resolved transition.
Marble to Mosaic Transition
A field of larger stone may transition into marble mosaic at:
- bathroom
- shower
- decorative inset
- threshold
Coordinate:
- thickness
- joint
- pattern centerline
- edge
before installation.
Lift Lobbies
Lift doors create strong repeated architectural geometry.
Coordinate marble floor joints with:
- lift centerlines
- jambs
- entrance zones
where possible.
Random cuts directly in front of lift doors become highly visible.
Reception Desk Relationship
A lobby floor may use the reception desk as a focal anchor.
Possible strategies include:
- centered floor grid
- border around desk
- directional veins leading toward reception
- contrasting floor zone
The floor should participate in the spatial hierarchy.
Column Grid
Columns can disrupt a regular floor layout.
Before finalizing the module, test how joints interact with each column.
Poor layouts can create:
- tiny perimeter cuts
- unequal wraps
- inconsistent joints
Sometimes shifting the grid slightly resolves several columns at once.
Stone Around Circular Columns
Rectangular stone modules meeting a round column require carefully planned perimeter cuts.
Consider whether to use:
- radial pieces
- larger surrounding stone element
- metal trim
- controlled segmented cut
depending on the design.
Border Layouts
Borders can help organize large natural-stone floors.
They may:
- frame a room
- define reception
- separate circulation
- resolve perimeter cuts
- introduce contrasting stone
But borders should not be added merely as decoration.
Use Borders to Resolve Geometry
A border can absorb:
- irregular room dimensions
- perimeter tolerance
while preserving a clean central grid.
This can be particularly effective in:
- hotel lobbies
- formal entrance halls
Border Width
The correct border width depends on:
- room scale
- tile module
- architecture
A thin border in a huge lobby may disappear.
A very wide border in a small room may dominate.
Draw it at real scale.
Checkerboard Marble Floors
Two-stone checkerboard layouts can create strong graphic architecture.
Before specifying, coordinate:
- equal thickness
- compatible finishes
- dimensional calibration
- module size
- visual variation
Different stone families may respond differently to wear and maintenance.
Do Not Choose Contrasting Stones Only by Color
Two stones that look good together may have significantly different:
- abrasion behavior
- finish response
- maintenance
For heavily trafficked floors, material performance also matters.
Waterjet Marble Flooring
Custom waterjet floors may include:
- geometric borders
- medallions
- curved inlays
- logos or abstract compositions
- multi-stone patterns
These should be treated as fabrication packages rather than standard tile layouts.
Custom Floors Need Full CAD Geometry
Production drawings should define:
- overall size
- individual components
- material assignment
- orientation
- joints
- borders
- transitions
Low-resolution reference images are not production drawings.
Pre-Assembly for Complex Floors
Complex waterjet or multi-stone layouts can benefit from factory pre-assembly or dry layout.
This allows verification of:
- geometry
- missing pieces
- stone distribution
- joints
- overall dimensions
- section numbering
before shipment.
Divide Large Custom Floors into Installation Zones
A very large decorative floor can be organized into:
- Zone A
- Zone B
- Zone C
with numbered components inside each zone.
This simplifies:
- packing
- site handling
- installation
Marble Flooring Joints
Floor joints should not be treated as an unwanted graphic to be minimized at all costs.
They are necessary parts of the assembly.
The design should consider:
- tile-to-tile joints
- perimeter conditions
- required movement accommodation
- structural or substrate joints
according to the applicable system.
Zero-Joint Marble Flooring Is Not a Design Goal
Natural stone has:
- dimensional tolerance
- thermal movement
- installation tolerance
A realistic, consistent joint generally performs and looks better than an impossible “zero joint” requirement.
Joint Width Depends on the Product and System
There is no one universal joint dimension suitable for every marble floor.
Relevant factors include:
- piece size
- stone tolerances
- edge condition
- installation method
- project requirements
- movement
The final specification should reflect the actual product and assembly.
Movement Joints Are Different from Grout Joints
Grout between stone pieces does not replace required movement accommodation.
Where movement joints are required, they should be carried through the stone finish according to the floor system.
Do not rigidly bridge them.
Integrate Movement Joints into the Layout
If a required movement joint is known during design, align it where possible with:
- tile joints
- room divisions
- material transitions
- borders
so the technical requirement becomes part of the architectural grid.
Perimeter Conditions
Floors also need to meet:
- walls
- columns
- fixed objects
- other materials
appropriately.
Do not design the stone field as if the building never moves.
Structural Joints
Existing structural or building movement conditions require special coordination.
Do not conceal them under a continuous rigid marble field without an approved assembly solution.
Substrate Flatness Matters
Marble flooring quality depends heavily on what lies underneath.
An irregular substrate can contribute to:
- lippage
- uneven joints
- hollow areas
- difficult setting
Large-format pieces are especially sensitive.
Large Tiles Require More Accurate Substrates
A small piece can follow minor surface variation more easily.
A long rigid stone piece cannot.
As stone size increases, substrate preparation becomes increasingly important.
Do Not Use Setting Material to Hide Major Substrate Problems
The floor should be prepared to the requirements of the installation system.
Installation material should not become an uncontrolled leveling layer intended to fix poor structural geometry.
Lippage
Lippage is the vertical difference between neighboring finished stone edges.
It affects:
- appearance
- reflected light
- walking comfort
- cleaning
- potentially trip perception
Polished flooring can make small differences especially visible.
Lighting Reveals Lippage
Low-angle natural or artificial light can exaggerate:
- edge differences
- floor waves
- finish variation
If a lobby receives strong glazing light across the floor, quality requirements become more visually demanding.
Mock Up Critical Flooring
For major hospitality projects, a floor mock-up can help review:
- stone range
- finish
- joints
- lippage
- grout
- lighting
- cleaning appearance
before full installation.
Floor Finish Selection
Marble floors may use finishes such as:
- polished
- honed
- textured treatments
where suitable for the actual material and application.
Finish affects:
- appearance
- reflection
- maintenance
- wear perception
- frictional behavior
It should not be selected from appearance alone.
Polished Marble Flooring
Polishing can provide:
- strong color depth
- reflection
- vein definition
- formal appearance
This can be effective in:
- hotel lobbies
- residential halls
- premium interiors
when appropriate to the project.
But traffic and surface conditions still need evaluation.
Honed Marble Flooring
Honed marble provides:
- lower reflection
- softer color
- more restrained architectural character
It can be highly effective where:
- glare reduction
- contemporary appearance
are design priorities.
Performance must still be evaluated for the actual material.
Entrance Zones Need Additional Attention
An interior marble floor near an exterior entrance may be exposed to:
- rainwater
- grit
- dirt
- rolling luggage
- heavier cleaning
This is different from a dry interior gallery.
Consider:
- entrance mat strategy
- finish
- maintenance
- actual tested performance
for the zone.
Do Not Make Slip Claims from Finish Names Alone
A statement such as:
“honed is non-slip”
is too simplistic.
Slip behavior depends on:
- actual stone
- exact finish
- surface condition
- contaminants
- test method
Where slip performance is important, use relevant test data for the proposed surface.
High-Traffic Floors Need Performance Review
Public floors can be exposed to:
- pedestrian traffic
- luggage
- carts
- cleaning equipment
Material selection should therefore consider relevant performance characteristics.
These may include, depending on the project:
- abrasion resistance
- slip performance
- absorption
- compressive properties
- bending/flexural performance
Do not approve a hotel lobby floor from appearance alone.
Abrasion Resistance
Floor traffic can gradually change the appearance of natural stone.
This may become especially noticeable on:
- polished surfaces
- busy entrances
- lift halls
- circulation paths
For demanding commercial floors, review relevant abrasion data for the actual stone.
Wear Is Not Always Uniform
A large hotel lobby may develop stronger traffic lanes between:
- entrance
- reception
- lift
than in lounge areas.
Consider this when choosing:
- stone
- finish
- maintenance strategy
Marble Soundness and Fabrication Character
Some marble contains more:
- veins
- fissures
- natural structural features
than others.
This can affect:
- fabrication
- reinforcement
- handling
Stone classifications related to working characteristics should not be interpreted as quality or luxury grades.
The actual application remains the important question.
Thickness
There is no universal marble-floor thickness appropriate for every project.
Thickness depends on factors including:
- material
- piece dimensions
- installation system
- substrate
- traffic
- structural conditions
Do not specify thickness because it was used on another unrelated project.
Thickness Calibration
For tile-based flooring, consistent finished thickness can help produce:
- better level control
- easier installation
- more consistent joints
Fabrication and installation tolerances should be coordinated.
Heated Floors
Natural-stone floors may be installed over heated floor assemblies when the complete system is appropriately designed.
The design should coordinate:
- substrate
- heating system
- movement
- installation materials
- operating conditions
rather than considering the marble independently.
Stairs and Flooring Should Be Designed Together
If a marble floor reaches a staircase, coordinate:
- floor module
- first riser
- stair width
- tread dimensions
- vein direction
- landing grid
The transition should feel deliberate.
Landing Layout
A stair landing can continue:
- main floor grid
- stair direction
or introduce a new composition.
Decide which hierarchy is stronger.
Tread Vein Direction
On directional marble, veins may run:
- parallel to the tread edge
- perpendicular to it
Both create different visual effects.
Consider the whole staircase rather than each tread individually.
Stair Nosing and Floor Joint
Avoid awkward conditions where a floor joint ends:
- a few millimeters from the first stair nosing
unless intentionally detailed.
Coordinate the floor grid and staircase shop drawing.
Dry Lay
Dry layout is one of the most valuable tools for visually sensitive marble floors.
It allows pieces to be arranged before final installation or shipment.
The project team can review:
- tone
- vein distribution
- direction
- floor pattern
- borders
- special pieces
at meaningful scale.
Dry Lay Does Not Mean Every Floor Must Be Fully Assembled
The correct level depends on:
- project size
- material variation
- visual importance
- complexity
Possible levels include:
- representative dry lay
- room-by-room dry lay
- full feature-area layout
- complete custom waterjet pre-assembly
Use the effort where it adds value.
Dry Lay Should Follow the Real Floor Plan
A warehouse rectangle of marble tiles is not enough if the actual room includes:
- doors
- columns
- borders
- circulation changes
- thresholds
For important layouts, the dry lay should correspond as closely as practical to the intended installation map.
Show Real Joints
Tiles pushed tightly together can create an unrealistic visual preview.
Where practical, the layout should represent the intended joint character.
Piece Numbering
Once a floor arrangement is approved, assign piece or zone identities.
For example:
L01-A001
L01-A002
L01-A003
The coding method can identify:
- level
- area
- sequence
as appropriate.
Numbering Preserves the Design
The chain can become:
floor plan
→
dry lay
→
piece code
→
crate
→
installation location.
Without this chain, an approved floor arrangement can disappear during logistics.
Crate Mixing vs Controlled Distribution
There are two different concepts.
Controlled Factory Distribution
Tiles are arranged and numbered before packing.
Site Mixing
Installers open several crates and visually distribute natural variation during setting.
Which approach is appropriate depends on the project.
Do Not Install One Crate at a Time Without Reviewing Variation
If pieces were not pre-numbered for a specific layout, installing all of:
Crate 1
then:
Crate 2
can accidentally create tonal zones.
Natural stone should be reviewed across the available material.
Packing by Installation Zone
For large projects, crates can be organized by:
- lobby
- corridor
- lift hall
- room group
This simplifies logistics and can protect approved floor distribution.
Installation Drawings
A useful stone-floor installation drawing may show:
- grid
- module
- joint
- orientation arrows
- borders
- thresholds
- piece numbers
- special cuts
- movement conditions
For complex floors, the installation drawing is part of the design package.
Starting Point
The site team should know where the floor setting-out begins.
This may be:
- architectural centerline
- lobby entrance
- reception axis
- lift centerline
- main datum
Do not let each installer establish a different local starting point.
Control Dimensions
Architectural drawings should distinguish between:
- design dimensions
- verified site dimensions
where necessary.
A large floor can accumulate construction variation.
Final setting-out may need coordination with actual built conditions.
Do Not Put All Adjustment at One Edge
If the real room differs slightly from the drawing, the final perimeter should not automatically receive:
- one extremely narrow cut strip.
The setting-out strategy should control how dimensional variation is absorbed.
Perimeter Cut Size
Small perimeter cuts can look poor and may be difficult to fabricate or install.
Before construction, test the grid against:
- all walls
- columns
- openings
to avoid unnecessary slivers.
Skirting Relationship
When marble flooring uses a stone skirting/base, coordinate:
- floor joints
- wall joints
- base lengths
- corners
where visual alignment matters.
The base should not appear unrelated to the floor.
Floor Pattern Options
Marble flooring can use several architectural approaches:
- straight grid
- running bond
- alternating modules
- checkerboard
- borders
- diagonal grid
- geometric waterjet
- slab-cut continuous composition
The pattern should suit both:
- material
- architecture.
Straight Grid
A straight grid is often the most neutral approach.
It can work particularly well when the marble itself contains substantial natural movement.
The geometry does not compete with the stone.
Running Bond
Offset rectangular modules can create:
- directional movement
- less rigid grid
But the relationship between tile length, joint offset and natural stone performance should be evaluated with the actual product and installation system.
Do not select a bond pattern only from a generic tile image.
Diagonal Layout
A 45-degree grid can create:
- visual expansion
- dynamic movement
but also:
- more perimeter cutting
- potentially higher waste
- more complex door conditions
Use it because it improves the architecture, not because it appears decorative.
Slab-Cut Flooring
Certain high-end projects may use large custom pieces cut from selected slabs rather than standard tiles.
This allows more control over:
- veins
- flow
- large-scale composition
but requires:
- slab mapping
- greater yield analysis
- more sophisticated fabrication
- installation sequencing
Sequential Floor Panels
A selected slab sequence can sometimes be used to create continuous floor movement.
This is particularly relevant in:
- entry halls
- hotel lobbies
- private galleries
where the floor itself becomes a major architectural feature.
Bookmatched Marble Floors
Bookmatch can also be used horizontally.
But consider the viewing condition.
Users view floors:
- at an angle
- while moving
- partially covered by furniture
A highly elaborate four-way match may have less impact on a floor than on a wall.
Evaluate whether the additional stone selection and yield are justified.
Floor Medallions
A medallion can create a focal center.
Coordinate it with:
- chandelier
- reception
- staircase
- furniture
- room axis
rather than centering it simply because the room is rectangular.
Pattern and Furniture
Large dining tables, lounge groups and reception desks may cover substantial portions of the floor.
Overlay furniture on the floor-layout drawing before finalizing special stone features.
Do not place the most expensive waterjet composition underneath a permanent desk.
Hotel Lobby Marble Flooring
Hotel lobbies are one of the most demanding natural-stone floor conditions because they combine:
- large scale
- visual importance
- traffic
- rolling luggage
- entrances
- cleaning
- lighting
The specification should balance:
design
and
operation.
Hotel Lobby Grid
A lobby plan should coordinate:
- entrance
- reception
- lifts
- lounge
- columns
- circulation
before choosing the module.
Sometimes one continuous grid works.
In other projects, different floor zones may be more coherent.
Dramatic Marble in Large Floors
Highly veined marble can become much busier when repeated hundreds of times.
For large floors, consider whether the desired effect is:
- calm consistency
- expressive geological field
- controlled feature zone
rather than simply choosing the most dramatic slab.
Use Statement Stone Strategically
One approach is:
calmer main floor
dramatic reception feature
or
decorative central inset.
This can give the project stronger hierarchy.
Lighting and Marble Floors
Polished floors interact strongly with:
- windows
- ceiling lights
- chandeliers
- wall washing
The lighting model should include realistic material reflection.
A floor that looks calm under diffuse showroom light may behave differently beneath strong lobby glazing.
Daylight Direction
Long windows can create strong reflected bands across polished marble.
This may highlight:
- lippage
- surface changes
- scratches
- traffic wear
Consider final daylight orientation during finish selection.
Mock-Up Under Final Lighting
For high-value public areas, reviewing a floor mock-up under representative:
- artificial light
- daylight
can help establish realistic expectations.
Maintenance Planning Begins During Specification
Floor design should consider how the building will operate.
Ask:
- How will grit be controlled?
- Where are entrance mats?
- How frequently will the floor be cleaned?
- What equipment will be used?
- What substances may reach the surface?
Material care should not begin after opening day.
Acid-Sensitive Marble
Many conventional marbles are calcium-carbonate based.
Acidic cleaning products can damage the surface.
Maintenance specifications should therefore use appropriate non-acidic cleaning systems for acid-sensitive material.
Entrance Grit
Dirt and grit can act abrasively on stone floors.
Entrance matting and regular dust removal can help reduce unnecessary surface wear.
This is particularly relevant for polished marble.
Sealers and Floors
An appropriate impregnating treatment may improve stain resistance for certain stones and applications.
It does not:
- eliminate wear
- create universal slip resistance
- make acid-sensitive marble acid-proof
Treatment should be specified for the actual material and maintenance regime.
Quantity Planning
The required stone quantity is more than:
net floor area.
Additional material may be required for:
- perimeter cuts
- pattern
- vein selection
- dry lay
- breakage
- spare pieces
- future replacement
The appropriate allowance depends on the real layout.
Large Format May Increase Waste
A 600 × 1200 module may produce different yield from:
- 600 × 600
even across the same floor area.
Custom slab mapping can affect yield further.
Request production review when quantities are significant.
Borders Increase Cutting
Decorative borders may require:
- additional stone
- custom dimensions
- corner pieces
This should be reflected in quantity calculations.
Diagonal Layout Increases Perimeter Offcuts
Angled grid layouts often create more cut material at walls.
Do not price them from net square meter area alone.
Spare Material
For substantial projects, consider retaining original spare stone.
Useful replacement material may be needed for:
- damaged pieces
- future services
- renovations
A later production batch may not visually match the original floor.
Spare Pieces vs Spare Raw Material
Depending on the project, spare material may be stored as:
- finished tiles
- cut pieces
- slabs
Finished pieces simplify replacement.
Raw material may offer greater future flexibility.
Floor Shop Drawings
A large marble flooring package can benefit from shop drawings showing:
- setting-out axis
- module
- joint
- dimensions
- border
- transitions
- thresholds
- stairs
- columns
- special pieces
- orientation arrows
- piece codes
- movement conditions
This should correspond to the architectural design.
Coordinate Revisions
If a doorway moves after the floor package is approved, the change may affect:
- several floor pieces
- border
- threshold
- quantity
- crate plan
Revisions need to return through the coordinated layout.
Quality Control Before Shipment
For marble flooring, quality control can include review of:
- stone range
- finish
- dimensions
- thickness
- squareness
- edges
- special pieces
- numbering
- quantities
according to the project specification.
Dimensional Accuracy
Patterned floors depend strongly on dimensions.
A small repeated error can accumulate across:
- many rows
- borders
- custom inserts
Precision becomes more important as the pattern becomes more complex.
Check Special Pieces
Before packing, verify separately:
- thresholds
- border corners
- column pieces
- stair components
- waterjet sections
because one missing special piece can delay an entire installation zone.
Pre-Shipment Dry-Lay Approval
For visually critical areas, the architect may approve:
- overview photographs
- zone layouts
- numbered pieces
- detail views
before packing.
This provides a final visual checkpoint.
Packing Plan
Packing should preserve the production logic.
Where practical, crates should identify:
- project
- floor
- zone
- piece range
This reduces unnecessary sorting on site.
Installation Sequence
A well-planned installation follows:
- approved axis
- approved grid
- approved orientation
- piece sequence
rather than simply installing whichever crate is opened first.
Protect Installed Marble During Construction
A correctly installed marble floor can still be damaged before handover by:
- construction traffic
- grit
- dropped tools
- staining materials
Protection strategy should be coordinated as part of site execution.
Avoid Trapping Moisture Incorrectly
Temporary floor protection systems should be compatible with:
- natural stone
- adhesives
- curing conditions
- project environment
Do not apply an arbitrary impermeable cover without considering the complete installation system.
Architect’s Marble Flooring Checklist
Before releasing marble flooring, confirm:
Architecture
- floor boundaries
- primary axis
- doors
- lifts
- columns
- stairs
- reception
- furniture
- transitions
Material
- exact marble
- approved visual range
- finish
- relevant technical information
- current availability
Format
- tile or panel dimensions
- thickness
- rectangular/square orientation
- custom pieces
Layout
- grid
- vein direction
- border
- checkerboard or special pattern
- thresholds
- perimeter cuts
- stair relationship
Joints
- tile joints
- required movement accommodation
- perimeter conditions
- transition joints
Substrate
- structural suitability
- flatness
- installation system
- heated-floor coordination where relevant
Performance
- project traffic
- abrasion considerations
- slip requirements
- wet entrance conditions
- cleaning and maintenance
Visual Control
- range sample
- batch review
- dry lay
- vein distribution
- tonal distribution
Documentation
- floor plan
- shop drawing
- orientation arrows
- piece numbering
- special-piece schedule
- revision status
Production
- dimensions
- calibration
- finish
- edge quality
- waterjet work
- special cuts
Logistics
- crate zones
- installation sequence
- spare material
- site access
Installation
- setting-out datum
- tile distribution
- joint consistency
- protection
- final cleaning
Not every project needs every item.
The checklist should scale with:
- floor area
- visual importance
- material variation
- technical risk.
Questions Architects Should Ask Before Specifying a Marble Floor
- What is the exact marble?
- What visual variation should we expect?
- Is current production suitable for the required quantity?
- What formats can be produced efficiently?
- What thickness is appropriate for the proposed system?
- What finish options are available?
- What relevant technical data is available?
- How does the stone perform under the expected traffic?
- Is slip-performance data required for the application?
- Can we review representative full-size material?
- Should the veins have a controlled direction?
- Can tiles be sorted by tone and movement?
- Is dry layout recommended?
- Can the floor plan be reproduced during dry lay?
- How will pieces or zones be numbered?
- What movement conditions must appear in the layout?
- What substrate requirements apply?
- Can borders and thresholds be pre-fabricated?
- How will crates correspond to installation zones?
- How much spare material should be retained?
These questions establish whether the project is ordering:
marble tiles
or
a coordinated marble floor.
Common Marble Flooring Mistakes
Choosing Module Size Before Studying the Plan
The result may create poor perimeter cuts and awkward doors.
Starting the Grid from the Nearest Wall
The architecture may become unbalanced.
Using a Generic Material Texture in Renderings
The image may hide the real number of joints.
Ignoring Vein Direction
Directional marble may look chaotic after installation.
Installing One Crate at a Time
Natural variation can become concentrated into visible patches.
Demanding Identical Tiles
Natural stone should be controlled, not made artificially uniform.
Specifying Zero Joints
Real installations require appropriate tolerance and movement accommodation.
Ignoring Movement Conditions
Rigid stone should not bridge required movement joints without an approved design solution.
Choosing Finish Only by Appearance
Traffic and slip conditions also matter.
Assuming Honed Means Non-Slip
Performance depends on the actual stone and tested surface.
Using Polished Marble at a Wet Entrance Without Evaluation
Entrance conditions can differ significantly from dry interiors.
Ignoring Substrate Flatness
Large natural-stone pieces can reveal installation irregularities.
Selecting Very Large Tiles Without Checking Slab Yield
Large formats may increase waste and cost.
Dry Laying Without Following the Actual Plan
A neat warehouse rectangle may not represent the installed floor.
Approving Tone but Not Distribution
Good material can still look poor if variation is clustered.
Forgetting Thresholds
Transitions often become the most visible installation details.
Designing Borders After the Main Floor Is Ordered
Special dimensions may affect both quantity and yield.
Ignoring Furniture
The focal floor pattern may end up hidden beneath fixed elements.
Failing to Number Complex Floors
The approved layout can be lost during installation.
Packing Without Installation Zones
Site sorting becomes unnecessarily difficult.
A Practical Marble Flooring Workflow
1. Define the Space
Map all architecture and fixed objects.
2. Establish the Primary Axis
Determine the floor’s main setting-out direction.
3. Select the Stone Direction
Color, variation and geological character.
4. Review Relevant Material Performance
According to the application.
5. Select the Finish
Considering both design and use.
6. Test Tile Formats
Compare several modules on the real plan.
7. Resolve the Grid
Doors, columns, walls and thresholds.
8. Define Vein Direction
Where the marble is directional.
9. Coordinate Movement Conditions
With the complete floor assembly.
10. Resolve Transitions
Stone, timber, carpet, mosaic and stairs.
11. Confirm Current Stone Availability
Before final procurement.
12. Establish the Visual Range
Define acceptable variation.
13. Produce Shop Drawings
Where project complexity requires them.
14. Fabricate Special Pieces
Borders, thresholds and waterjet work.
15. Dry Lay Important Areas
According to the actual plan.
16. Balance Tone and Vein Distribution
Across the floor field.
17. Number Pieces or Zones
Where required.
18. Quality Control
Visual and dimensional.
19. Pack by Installation Logic
Not only factory convenience.
20. Install from the Approved Datum
Protect the designed composition.
The workflow should maintain continuity from:
architectural plan
to
finished floor.
Final Thoughts
Marble flooring is not simply a finish schedule item.
It is one of the largest continuous visual systems inside many buildings.
A successful marble floor connects:
architecture
module
grid
stone
vein direction
variation
joints
substrate
performance
installation.
Do not begin by asking whether the floor should be:
600 × 600
or
600 × 1200.
Begin by understanding:
- the room
- the movement
- the focal axis
- the stone.
Then test modules.
Draw every joint.
Coordinate thresholds.
Avoid small perimeter fragments.
Decide whether geological movement should be directional or naturally distributed.
Define an acceptable visual range.
Select finish according to both appearance and actual use.
Review relevant performance information for heavily trafficked or sensitive areas.
Preserve required movement accommodation.
Prepare the substrate correctly.
Use dry layout where visual control justifies it.
Distribute natural variation.
Number complex layouts.
Pack according to installation sequence.
And protect the floor after installation.
The objective is not simply to cover a surface with marble.
It is to make the stone floor participate in the architecture.
Frequently Asked Questions
What is the best marble tile size for flooring?
There is no universal best size. Format should respond to the room dimensions, stone, slab yield, installation system and architectural intent.
Is 600 × 600 marble good for large floors?
It can be highly effective because its square grid is relatively neutral and flexible, but the final suitability depends on the project and stone.
Is 600 × 1200 marble better than 600 × 600?
Not universally. A rectangular format creates stronger direction and fewer joints in one axis, while square formats provide a more neutral grid. The floor plan should determine the choice.
Are large marble floor tiles better?
Larger pieces can reduce joints and preserve more stone pattern, but they also demand better substrate preparation, handling and material yield. Larger is not automatically better.
Should marble veins run in one direction on a floor?
For directional stone, controlling vein orientation can create a more intentional floor. Other projects may benefit from controlled natural distribution. The strategy should be defined before installation.
Should marble flooring be dry laid?
Dry layout can be particularly valuable for highly variable or visually important floors. Not every project requires the entire floor to be dry assembled.
What is a marble floor dry lay?
It is a pre-installation arrangement of stone pieces used to review relationships such as color, vein direction, pattern and sequence before final placement.
Should marble floor tiles be numbered?
Numbering can be very useful when a specific dry layout, waterjet design or directional floor composition has been approved.
How should natural marble variation be managed?
Define an acceptable range and distribute different tones and vein intensities intentionally rather than expecting every tile to be identical.
Should marble floor tiles have zero joints?
A zero-joint requirement is generally unrealistic. Joint design should reflect stone tolerances, installation needs and movement requirements.
Are grout joints the same as movement joints?
No. Normal tile joints do not replace required movement accommodation in the floor assembly.
Can movement joints be covered with marble?
Required building or floor-system movement conditions should not simply be rigidly bridged by the stone finish. They must be properly coordinated with the floor design.
Is polished marble suitable for hotel lobbies?
It can be used in appropriate projects, but material performance, traffic, entrance moisture, slip considerations and maintenance should be evaluated for the actual application.
Is honed marble non-slip?
The term “honed” alone does not establish slip performance. The actual stone, finish and surface condition need to be evaluated according to relevant requirements.
What technical information matters for commercial marble flooring?
Depending on the application, architects may need information related to abrasion, slip performance, absorption and structural properties of the proposed stone.
Why is substrate flatness important for marble floors?
An unsuitable substrate can contribute to lippage, uneven joints and installation problems, particularly with large-format natural stone.
How should marble floors transition to timber?
Coordinate finished levels, movement requirements, edge details and joint conditions between the two flooring systems.
Should hotel lobby marble be selected from one batch?
Where visual consistency is important, coordinating production material as a project batch can help control tone and geological character.
Should spare marble be retained after installation?
For significant projects, retaining original material can simplify future repair because later natural-stone production may not visually match the original floor.
Developing a Marble Flooring Package?
VeraMarbles supports architects and interior designers developing natural-stone flooring for hospitality, residential and commercial projects.
Send us your:
- floor plan
- project area
- preferred marble
- required module
- finish
- estimated quantity
- vein-direction concept
- borders or special patterns
- threshold details
- project location
- schedule
We can support your project with:
- marble selection
- visual-range coordination
- full-slab review
- cut-to-size flooring
- custom tile formats
- large-format pieces
- vein-direction planning
- floor-layout coordination
- thresholds
- borders
- waterjet flooring
- dry layout
- tonal distribution
- piece numbering
- special-piece fabrication
- dimensional quality control
- pre-shipment inspection
- installation-zone packing
- spare-material coordination
Request Marble Flooring Specification Support from VeraMarbles