
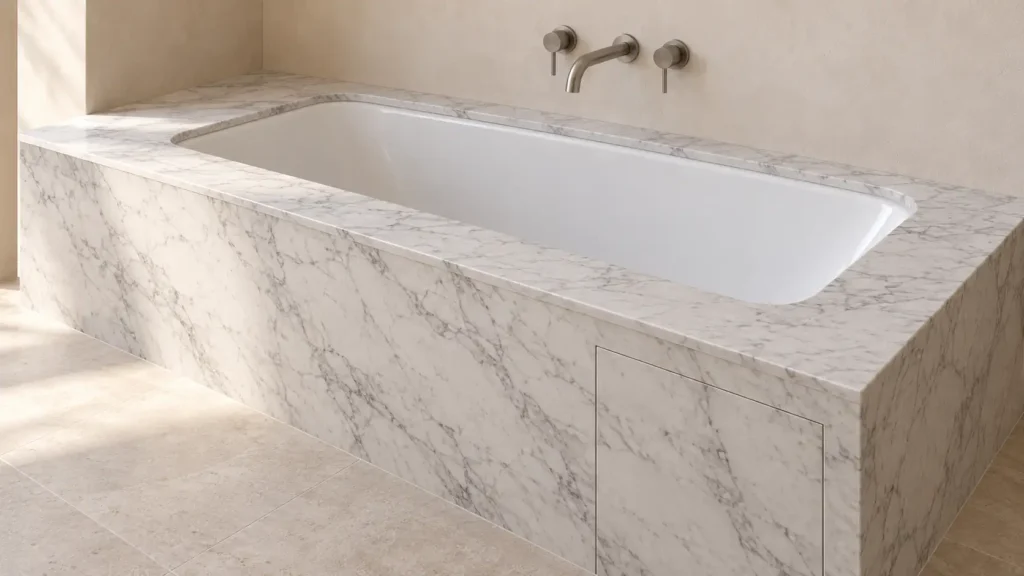
A marble bathtub surround brings the horizontal bath deck, vertical apron and exposed returns into one stone composition. Its success depends on the relationship between the bathtub, the stone opening, the supporting construction and the plumbing that must remain accessible.
Start with the exact bath model and its approved installation method. Then develop the marble layout around the finished room dimensions, the cutout and the servicing requirements. A compelling elevation needs a workable section behind it.
Choose the Bath Installation Before Designing the Stone
“Bathtub surround” can describe wall panels, a horizontal deck or a complete stone enclosure. Define the scope in the drawings so the quotation covers the intended pieces.
For a deck-and-apron surround, distinguish these configurations:
| Configuration | Relationship to the marble | Design decisions |
|---|---|---|
| Drop-in bath | The bath rim sits above the finished deck | Visible rim, cutout clearance and sealing interface |
| Undermount bath | The deck overlaps the bath rim | Finished opening edge, reveal, support and cleaning access |
| Bath with separate stone apron | Stone forms the vertical enclosure; the top detail depends on the bath | Apron joints, returns and removable access |
Confirm that the selected model permits the proposed arrangement. A bath intended for one installation method should not be redetailed for another solely to achieve a preferred image.
For an undermount layout, draw the relationship between the stone opening and the bathing well. A deep overlap may conceal more of the rim, but it also changes reach and access for cleaning beneath the edge.
Separate the Bath Support from the Stone Support
Show how the bath and the marble deck are supported. Do not leave either load path implicit in a visualisation.
For example, the Kohler installation guide for models K-895 and K-896 requires the bath to bear on its feet rather than its rim or framing. Its undermount instructions also require support beneath the counter rather than relying on the bath to carry it. These requirements apply to those models; use the selected bath’s own instructions for the project.
Coordinate the supporting construction with the stone fabricator, installer and relevant designer. The large central cutout, remaining strips of marble, actual slab condition and planned joints all affect the fabrication proposal.
A thick-looking apron or mitred front edge does not establish the structural capacity of the deck.
Dimension from Finished Surfaces
A nominal bath size is insufficient for a stone cutting drawing. Obtain the current manufacturer’s template or approved cutout information and agree when site dimensions can be verified.
The shop drawing should identify:
- Finished deck length, depth and top level.
- Bath opening dimensions, corner radii and position.
- Actual stone thickness and any built-up edge.
- Front and side projections beyond the apron.
- Wall interfaces and specified joints.
- Tap, spout and hand-shower locations where applicable.
- Access opening and removable panel dimensions.
Keep the outer deck outline and the bath cutout as separate dimensioned geometries. This makes unequal border widths visible before cutting.
Also review the narrowest remaining strips beside the opening. Their suitability depends on the selected stone, support, handling method and fabrication details; a universal minimum cannot replace that review.
Make the Deck Comfortable to Use
Deck width affects how someone enters the bath, reaches the controls and cleans the surrounding surface.
Check these relationships in section as well as plan. A broad front ledge can look balanced in an elevation while making the bath awkward to reach. A narrow rear strip can leave insufficient room for fittings or cleaning.
For deck-mounted hardware, coordinate hole positions with the fitting manufacturer’s requirements, underside connections and access for tools. For a wall-mounted spout, verify its projection against the finished stone edge and bathing well.
Do not treat the deck as a seat or step unless the assembly has been designed for that use.
Resolve Water Management at the Interfaces
Detail the bath rim, deck, wall junction and apron together with the project’s waterproofing system. Identify how splash water will be managed and how the waterproofing connects to the selected bath.
The surface sealant joint is one part of that assembly. Sealing the marble surface does not resolve an incomplete waterproofing connection behind it.
If a shower operates over the bath, review the surround as part of that wet-area assembly. Confirm the bath’s suitability, wall interfaces, screen fixings and water-management details before releasing the stone.
Specify joint materials compatible with the marble and adjacent components, and confirm their use with the relevant suppliers.
Draw a Service Panel That Can Be Removed
Locate the access opening around the components that need servicing. Then design the visible apron layout around that opening.
The access detail should establish:
- What must be reached through the opening.
- The required clear opening and working space.
- How the panel is retained and removed.
- How its weight is supported during removal.
- How the perimeter joint is finished and reinstated.
- Whether surrounding fittings obstruct the removal path.
A small panel aligned with the stone veins may look discreet but provide inadequate working space. Review access with the plumbing contractor and equipment supplier before fixing the panel size.
Where practical, use slab-layout photographs to position the removable piece within the apron composition. Show its perimeter joint honestly in the elevation.
Plan Veins, Corners and Exposed Edges Together
A bathtub surround combines horizontal and vertical views of the same material. Mark the viewing direction for the deck, front apron and exposed end before approving the slab layout.
Review actual slabs within the VeraMarbles marble collection. Judge how the pattern works around the opening and across the apron, rather than selecting from a small sample alone.
A single slab may offer a continuous deck pattern, but transport, access, cutout geometry and installation can justify multiple pieces. Agree joint locations before fabrication.
For a mitred corner, specify the intended pattern relationship and review the proposed cutting layout. Matching the material name alone does not guarantee vein continuity.
An undermount opening also exposes a long inner edge. Specify its finish, edge profile and treatment at the corners. Include every visible return and underside area in the finishing schedule.
Issue a Coordinated Fabrication Package
A useful quotation package includes the bath model, installation instructions, verified dimensions, stone selection, finish, deck layout, apron elevations and service-access detail.
State who supplies the supporting construction, waterproofing, fittings and installation. Identify which dimensions remain provisional and who will approve the final cutting drawings.
VeraMarbles provides natural-stone project support, including drawing and BOQ review, sample coordination, shop-drawing coordination and quality checks. Share the bath information and surround drawings together so the material and fabrication scope can be reviewed as one package.
Frequently Asked Questions
Can every bathtub be installed beneath a marble deck?
No. Confirm that the exact bath model permits undermount installation and follow its installation instructions. The stone opening and support detail must suit that model.
Should a marble bath deck be made in one piece?
That depends on slab dimensions, the cutout, site access, transport and installation. A planned joint can be preferable to an impractical single-piece design.
Can the marble apron conceal a removable panel?
Yes, where a suitable retention and removal detail is developed. Establish the clear service opening first, then coordinate the panel joint with the stone layout.
Does a deeper marble edge mean a thicker slab?
Not necessarily. A built-up or mitred edge can create a deeper appearance. State actual slab thickness and assembled edge depth separately in the specification.