
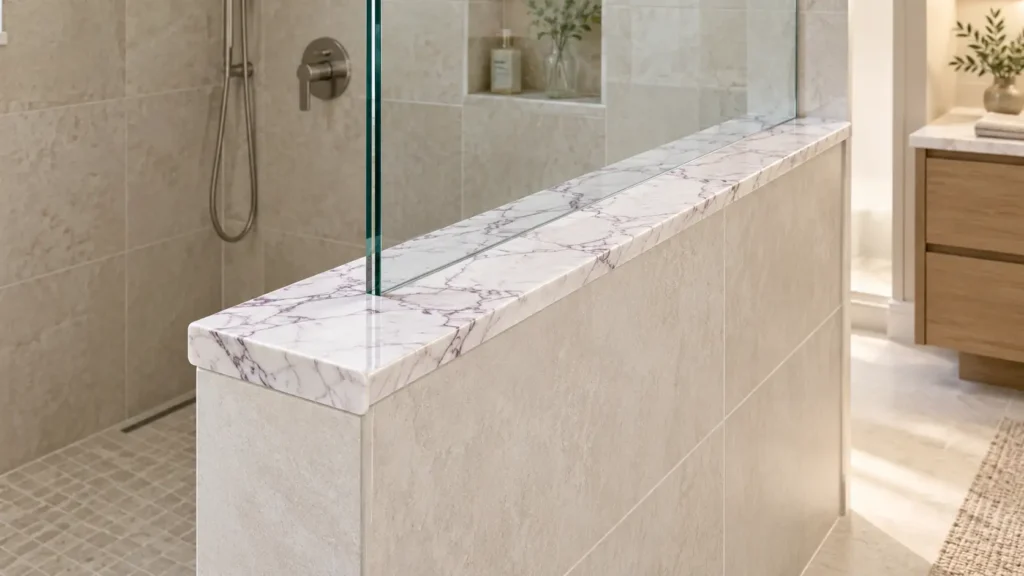
A marble shower half-wall cap is the stone piece finishing the top of a partial-height shower partition. Also called a pony-wall or knee-wall cap, it should be detailed with the finished wall width, glass position, drainage direction and visible ends.
The most useful starting point is a section through the complete assembly. It should show the shower side, bathroom side, stone, waterproofing and glass interface together.
This guide focuses on natural marble caps above shower half walls. The entrance curb is a separate detail, even when both pieces use the same stone.
Establish What Sits Above the Wall
Confirm whether the half wall carries a fixed glass screen, forms part of a door enclosure or finishes as an open partition.
Each arrangement changes the coordination required at the top.
For a glazed wall, agree the screen position, hardware or channel arrangement, support requirements and installation sequence with the glass specialist. Ask the responsible designer to confirm the wall construction for that arrangement before approving the stone.
If the wall finishes without glass, the entire cap remains a visible horizontal surface. Review its drainage, edges and relationship to the surrounding room accordingly.
Dimension the Cap from the Finished Wall
Measure or establish the completed wall width, including both finish build-ups. Framing width alone is not the cap width.
For a simple rectangular detail:
Cap width = finished wall width + shower-side projection + bathroom-side projection.
Use this as a dimensioning relationship, not a prescription for how far the stone should project.
Agree each projection with the edge detail, wall faces and glass arrangement in view. The two sides do not have to be symmetrical if the approved design calls for another solution.
| Dimension | What the drawing should establish |
|---|---|
| Finished wall width | Distance between the completed shower and bathroom faces |
| Cap width | Overall stone width, including agreed projections |
| Cap length | Dimension between the approved end conditions |
| Stone thickness | Actual stone section and any separate edge build-up |
| Finished top levels | References needed to establish the designed fall |
| Glass position | Location relative to the finished wall and stone edges |
Record whether the measurements are design dimensions or final site dimensions. Reconcile changes in tile or panel thickness before releasing fabrication.
Draw the Glass Line Separately
A cap may be wider than the glass above it, leaving a visible strip on both sides.
Show those strips in plan and section. Decide how the glass position relates to the wall below, the enclosure return and any adjacent door.
A glass centreline centred on the stone is not automatically the correct position for the complete enclosure. Check alignment across the whole shower.
Resolve the interface with the glass specialist, including clearances, sealing, hardware footprints and any proposed cut-outs. A cap’s stone thickness should not be treated as proof that it provides suitable anchorage.
Coordinate Drainage and Waterproofing Together
Identify how water on the top surface returns to the shower. Show the direction and required fall, coordinated with the supporting construction and selected waterproofing system.
Check that the glass interface, fittings and end joints do not create a pocket that retains water or redirects it toward the dry side.
Schluter’s shower-system instructions call for horizontal shower surfaces to slope toward the drain and require penetrations through its waterproofing assembly to be addressed. Apply the current instructions for the system selected for the project. Schluter shower-system installation handbook
Continue the approved waterproofing detail across the wall top and through its junctions. The stone cap and its surface treatment do not replace that assembly.
Any proposed glass fixing that affects the waterproofing should be resolved in the coordinated detail before installation.
Design the Exposed Short End
A half-wall cap often has two visible long edges and one particularly prominent short end facing the room.
Identify every exposed face on the fabrication drawing. Specify its finish and edge treatment, including the underside where a projection leaves it visible.
Review how the short end meets the vertical wall face. A square termination, rounded treatment or other profile can each create a different appearance.
Use a physical sample where the edge will be close to the user’s hand or eye. Commercial edge names alone may not communicate the exact shape intended.
At the opposite end, show how the cap meets the full-height wall. Include the joint allowance and the relationship to the wall finish.
Resolve Changes of Direction in Plan
An L-shaped half wall introduces an additional corner and often another stone joint.
Compare the proposed component arrangement in plan. Identify which piece continues through the junction, where the joint falls and how the visible edges terminate.
Coordinate drainage across the junction and confirm that the proposed pieces can be supported and installed as designed.
For a straight cap, a single piece may simplify the appearance. Its practicality still depends on usable material, handling, access and the final end conditions.
Approve any necessary joints deliberately rather than leaving their position to the cutting schedule.
Select the Stone as a Narrow Composition
A cap shows only a strip of the original slab. Its pattern may therefore read differently from a large wall or countertop.
Mark the cap outline over a photograph of the proposed material. Review where prominent veins meet the edges and exposed end.
If the cap is intended to coordinate with a vanity, niche or curb, select those pieces together. Matching names provide a starting point; actual piece approval establishes the visual relationship.
For Lilac-family selections, the New York Marble and Milas Lilac comparison guide explains why full-material review is more useful than relying on commercial names alone.
Other options can be shortlisted through the VeraMarbles marble collection.
Confirm the actual stone’s suitability, finish, treatments and installation-material compatibility for the proposed use.
Freeze the Interface Before Drilling or Notching
List any holes, rebates or notches required by the approved glass design.
Agree who supplies the dimensions, who performs the work and when it takes place. Coordinate tolerances and the position of the underlying support.
Late hardware changes should return to the project team for review. A different fitting can change the cap detail, fixing position or waterproofing interface.
Keep the approved stone drawing and glass drawing referenced to the same finished dimensions.
Check the Cap Before Glass Installation
Agree an inspection point while the stone and its junctions remain accessible.
Review the completed cap against the approved detail:
- Overall fit and projections.
- Finished levels and drainage direction.
- Exposed edges and short-end treatment.
- Wall junctions and visible joints.
- Material appearance and surface finish.
- Agreed hardware provisions.
- Glass setting-out references.
Record any corrections before the glass installation proceeds. The installation and acceptance checks should follow the selected systems and project requirements.
Protect the finished edges during subsequent work and provide care instructions for the stone, joints and glass interface.
Prepare a Quote-Ready Cap Schedule
For each cap type, provide:
| Information | Detail to include |
|---|---|
| Location | Bathroom or room reference |
| Geometry | Plan, section and finished end conditions |
| Dimensions | Length, width, thickness and measurement status |
| Material | Approved selection, finish and visual range |
| Edges | Finished faces and drawn profiles |
| Glass interface | Position, hardware requirements and drawing reference |
| Drainage | Designed direction and coordinated levels |
| Scope | Supply, site work, installation and approval responsibilities |
For repeated hotel rooms, separate mirrored layouts and dimensional variations. Use piece identifiers so the correct exposed end and orientation reach the correct location.
A small stone component benefits from the same drawing discipline as a large architectural panel.
Frequently Asked Questions
Is a half-wall cap the same as a shower curb cap?
They are related stone components in different positions. The half-wall cap finishes a partial-height partition, while the curb cap belongs at a raised shower entrance. Detail each against its own construction and interfaces.
How far should the cap project beyond the wall?
Set the projection from the finished wall faces, edge profile and enclosure design. There is no single dimension appropriate to every wall and glass arrangement.
Can the glass be centred on the marble?
It can be considered when it suits the complete enclosure. Confirm the glass position against the wall, door, support and sealing details.
Can the cap match the vanity top?
Potentially, subject to available material and the approved cutting layout. Review the actual pieces together and account for their different dimensions and orientations.
Discuss Your Marble Half-Wall Cap Detail
VeraMarbles’ natural-stone project services include material selection, shop-drawing coordination, dimensional checks and quality follow-up.
Share the half-wall plan and section, finished dimensions, glass drawing, preferred marble and quantities. Identify the exposed ends and edge profiles so the cap can be reviewed as a defined fabrication item.