
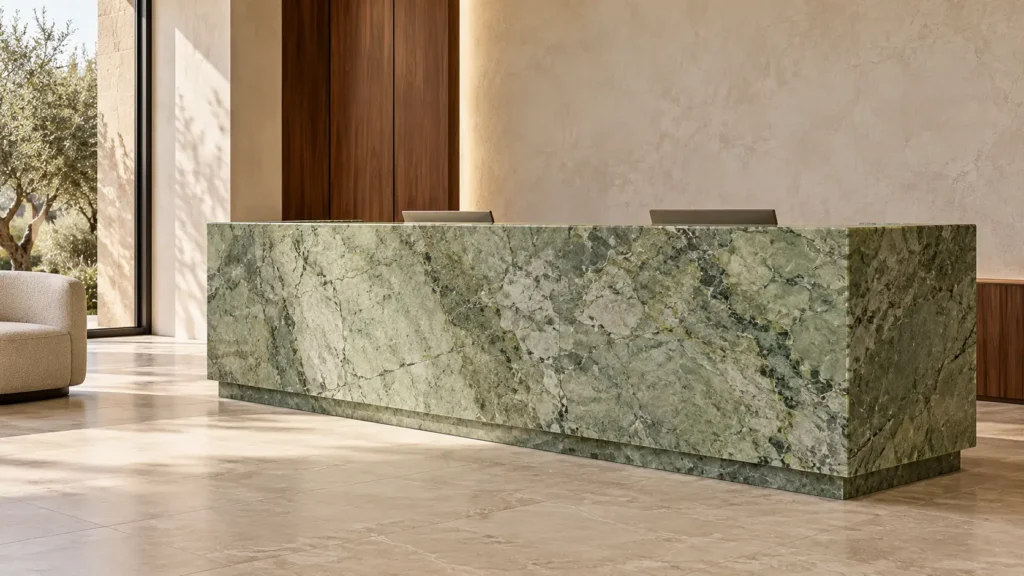
Choose green marble by reviewing its background colour, vein structure, scale and finish alongside the intended application. Approve the actual material and layout before translating a small sample into a wall, counter or piece of furniture.
“Green marble” describes a broad visual category. A white stone crossed by green veins creates a different interior from a predominantly green stone with fine mineral movement. Start by deciding which of those roles the room needs.
This guide brings that decision into focus using two materials in the VeraMarbles collection: Calacatta Green and Deep Forest.
Start with the Background Colour
The amount of green matters as much as its shade.
In a white-background stone, green can read as a line or formation within a light architectural field. In a green-background stone, the colour occupies more of the surface and has a stronger relationship with the room’s overall palette.
Review three characteristics separately:
- Background: the colour occupying most of the slab.
- Movement: the direction, density and contrast of veins or mineral formations.
- Distribution: how light, dark and quieter areas sit across the usable material.
A small sample may exaggerate one characteristic while hiding another. A mostly white sample taken between green veins cannot describe the complete wall composition.
Calacatta Green and Deep Forest: Two Design Directions
These materials offer different starting points for an interior.
| Material | Published visual description | Published formats and finishes | What to review in the actual selection |
|---|---|---|---|
| Calacatta Green | Soft white background with expressive green veining | Slabs and cut-to-size; honed or polished | White-to-green balance, vein positions and the composition of adjoining pieces |
| Deep Forest | Soft sage-green background with intricate veining and tonal variation | Slabs, cut-to-size, massive pieces and block; honed or polished | Background consistency, mineral movement and variation across the proposed quantity |
The Calacatta Green material page is a starting point when the design calls for green movement within a lighter surface.
The Deep Forest material page presents a different direction: a sage-green field with more distributed natural detail.
Use these descriptions to create a shortlist. Confirm the actual slabs or blocks, required quantity, dimensions and production options for the project.
Decide Where the Green Should Be Concentrated
Give the stone a clear role before extending it across the room.
A reception counter can establish the material identity of a lobby. A wall can become the main composition seen from the entrance. A table can introduce colour into an otherwise restrained interior without committing every permanent surface to it.
Consider three approaches.
One Defined Feature
Use the green stone on one principal element and review it beside quieter surrounding finishes.
For example, a green reception desk could sit against warm mineral plaster and walnut joinery. The design test is whether the desk remains the intended focal point under the actual lighting.
A Repeated Material Language
Repeat the stone in selected locations, such as an entrance counter and a smaller piece within a lounge.
Agree how the selections should relate. Repetition does not require identical pieces, but it benefits from a controlled visual range.
A Continuous Architectural Surface
Where the material wraps a wall or connects adjoining planes, design the panel arrangement and corners early.
Draw where the composition begins, where it ends and how openings interrupt it. Continuity should be approved using the proposed cutting layout.
Match the Slab Pattern to the Size of the Element
The same material can look very different at furniture scale and wall scale.
A large mineral formation may dominate a small tabletop. A fine pattern may read almost as a texture from the far side of a lobby.
Place a scaled outline of the intended element over photographs of the actual material. Rotate and reposition the outline before approving it.
For walls, show the panel boundaries and orientation. For counters, include the front, top and returns. For tables, review the part of the slab that remains visible around the base and seating arrangement.
Ask whether the finished piece will show the quality that made the material attractive in the first place.
Build the Palette with Physical Samples
Treat combinations with timber, metal and other stone as design options to test.
Useful starting points include:
- Pale oak beside a muted green surface.
- Walnut alongside a lighter white-and-green stone.
- Warm off-white plaster around a more expressive slab.
- Bronze or brushed metal as a limited accent.
- A quiet beige floor beneath a green feature element.
Review the samples together rather than selecting each finish in isolation. The undertone of the wood, plaster and flooring can change the relationship between otherwise compatible materials.
If several finishes contain strong pattern, establish which one leads. A quieter surrounding surface can give the natural stone more visual room.
Compare Honed and Polished Material Under Project Lighting
Honed and polished finishes offer different levels of reflection. Compare representative samples rather than judging the difference from unrelated photographs.
Review the stone under daylight and the proposed artificial lighting. Check the main viewing direction as well as close inspection.
A polished wall may reflect windows or fittings that are absent from the rendering. A honed surface may suit the intended atmosphere, but its maintenance requirements still need review.
Do not assume that a finish name establishes a floor’s slip performance or that a low-sheen surface is immune to chemical damage.
Approve the finish separately for each application.
Separate Appearance from Technical Suitability
A colour category is not a performance specification.
For the proposed stone, obtain the information relevant to the intended use. Depending on the element, that may include material identification, thickness, natural repairs, backing treatment, test information, fixing requirements and setting-material compatibility.
For wall panels, coordinate the substrate, panel support and joint arrangement.
For furniture and counters, resolve the support, overhangs, openings and handling requirements.
For wet areas or floors, review the actual exposure, finish, installation system and required performance with the project team.
Do not transfer approval from a dry decorative wall to a shower floor simply because the same stone name is used.
Plan Seams, Corners and Natural Variation
A successful green marble interior depends on how individual pieces work together.
Review adjacent slabs as a group. Identify quieter and more expressive areas, then decide how they should be distributed.
At corners, choose whether the design aims for visual continuity, a deliberate change of direction or a simpler compatible selection. Show the intended arrangement on the drawings.
If bookmatching is proposed, approve the actual material pair and the finished composition. Do not assume that every selection will support a convincing mirrored layout.
For larger projects, establish a representative acceptable range. One carefully chosen sample should not become an unrealistic promise that every piece will look identical.
Agree Care with the Owner or Operator
Choose the material with a practical cleaning routine in mind.
The Natural Stone Institute advises understanding the stone’s composition before selecting cleaning products, recommends appropriate neutral cleaners and explains the acid sensitivity of calcareous stone. Its guidance also describes impregnating treatments as repellents rather than products that make stone impervious. Natural Stone Institute care guidance
Confirm the care requirements for the actual material, finish and treatment. Avoid applying one generic routine to every stone sold under a green marble name.
For hospitality projects, include the cleaning team in approval and record the agreed products and methods in the handover information.
A Practical Selection and Approval Sequence
Before releasing the stone for production:
- Define the element and its visual role in the room.
- Shortlist materials using background colour and pattern.
- Review the actual proposed quantity and representative variation.
- Compare finishes beside the surrounding material palette.
- Approve the scaled cutting or panel layout.
- Resolve support, joints, installation and application-specific requirements.
- Confirm samples, mock-ups, quality checks and care information.
Keep the approved material photographs and drawings together. They should describe the same selection and intended result.
Frequently Asked Questions
Is green marble always dark?
No. The category includes white-background stones with green veins as well as predominantly green surfaces. Review the actual material rather than relying on the colour name.
Can green marble work in a small interior?
It can be considered as a concentrated feature, such as a vanity, table or wall panel. Test the pattern at the scale of the finished element and beside the room’s other surfaces.
Should green marble be honed or polished?
Choose according to the intended appearance, lighting, use and maintenance requirements. Compare representative samples in the proposed finish.
Can one green stone be used throughout a project?
Potentially, but approve each application separately. Availability, natural variation, format, support and exposure may differ between the wall, floor, furniture and wet-area elements.
Discuss Your Green Marble Selection
VeraMarbles’ natural-stone project services include material selection, sampling, shop-drawing coordination and quality follow-up.
Share the application drawings, approximate quantities, preferred visual direction and target finish. Include the surrounding palette where available so the material selection and cutting layout can be reviewed in the context of the interior.