
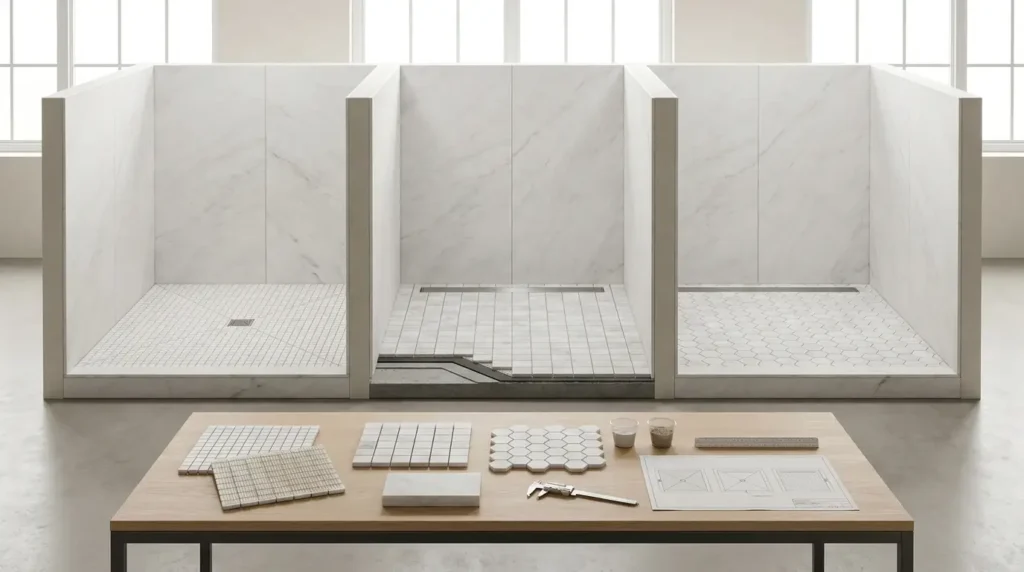
A marble mosaic shower floor should never be selected by pattern alone
The fact that a mosaic is:
- small
- beautiful
- mesh mounted
- made from marble
does not automatically make it appropriate for a shower floor.
A successful shower floor has to perform as a complete wet-area assembly.
The architect needs to coordinate:
natural stone
mosaic size
surface finish
slope
drain
waterproofing
substrate
setting material
grout
movement accommodation
maintenance.
The visible mosaic is only the final layer.
This is especially important because shower floors experience a combination of conditions that ordinary bathroom walls do not:
- continuous wetting
- bare-foot traffic
- soap
- shampoo
- body oils
- cleaning products
- drainage
- repeated drying cycles
The correct specification should therefore begin with the shower system rather than with the mosaic pattern.
Why Marble Mosaic Is Common on Shower Floors
Small natural-stone pieces offer one significant geometric advantage:
they can accommodate changing floor planes more readily than very large rigid stone pieces.
A shower floor often needs to direct water toward:
- a point drain
- a linear drain
- another approved drainage system
and those slopes create geometry.
Small pieces allow the finished surface to follow that geometry with fewer abrupt changes.
But this advantage should not be confused with universal technical suitability.
Mosaic Does Not Automatically Make a Floor Safe
A common assumption is:
more grout joints = non-slip floor.
More joints can influence the way a surface behaves underfoot.
But shower-floor safety depends on much more than joint density.
Relevant factors can include:
- stone type
- surface finish
- chip dimensions
- grout
- contaminants
- cleaning products
- surface wear
- testing method
The architect should never specify a marble shower floor solely because the pieces are small.
Start with the Actual Marble
Before choosing:
- square
- hexagon
- penny round
- herringbone
confirm whether the proposed natural stone is appropriate for wet exposure.
Review the actual supplied material.
Possible considerations include:
- water absorption
- density
- soundness
- natural fissures
- pore structure
- resin treatment
- mesh reinforcement
- mineral composition
depending on the project.
Marble Name Is Not Enough
Two stones may both be described commercially as:
white marble
yet behave differently in wet conditions.
Likewise, two blocks from one stone family may differ in:
- vein intensity
- natural repairs
- absorption
- fabrication behavior
For demanding shower applications, technical decisions should be tied to the actual proposed material.
Visual Selection Still Matters
Technical suitability does not eliminate aesthetics.
A shower floor contains hundreds of individual pieces.
A marble with dramatic dark veins may produce:
- mostly white chips
- isolated dark chips
- fragmented vein pieces
when cut into mosaic.
This can create more visual contrast than expected from the slab photograph.
Review the actual mosaic sample.
Calm Stone Can Work Particularly Well at Small Scale
A relatively restrained marble can provide:
- controlled tone
- subtle natural variation
- clear mosaic geometry
without making the floor visually chaotic.
This is particularly useful in bathrooms already containing:
- dramatic slab walls
- bookmatched marble
- statement vanity stone
where the floor should support rather than compete.
Same Marble on Wall and Floor
Using one marble family in two scales can create strong material continuity.
For example:
large-format marble wall panels
25 × 25 mm mosaic shower floor.
The stone remains consistent while the format responds to different technical conditions.
This is often more refined than introducing several unrelated materials.
Do Not Assume the Wall Finish Should Continue onto the Floor
A bathroom may use:
polished marble wall panels
but require a different surface strategy on the shower floor.
Vertical and horizontal wet surfaces should be specified separately.
Choosing Mosaic Chip Size
Chip size affects:
- slope conformity
- joint density
- stone visibility
- pattern scale
- drain detailing
- cleaning character
There is no universally correct shower-floor mosaic size.
Useful design ranges may include:
- approximately 10 × 10 mm
- approximately 15 × 15 mm
- approximately 20–25 mm squares
- small hexagons
- penny rounds
- other project-specific small formats
The final selection should respond to the complete shower geometry.
10 × 10 mm Square Mosaic
A fine 10 × 10 mm mosaic creates:
- very high joint density
- fine surface texture
- strong ability to accommodate geometric changes
The marble itself becomes less visually dominant.
At distance, the surface may appear almost continuous.
Advantages of Fine Mosaic
It may accommodate:
- localized slope changes
- smaller shower geometry
- complex floor planes
more easily than larger stone pieces.
Design Consideration
Because grout becomes a substantial percentage of the visible floor, the grout color strongly influences the result.
The floor may read more as:
mosaic + grout
than as marble alone.
15 × 15 mm Marble Mosaic
A slightly larger scale retains fine geometry while allowing more natural stone to remain visible.
This can create a useful balance between:
- slope adaptability
- marble character
- joint density.
20–25 mm Square Mosaic
Around 20–25 mm, individual marble pieces become much more recognizable.
The shower floor can still read clearly as mosaic while showing:
- local veins
- crystal structure
- tonal variation.
This is a particularly versatile architectural scale.
Why 25 mm Can Be Visually Strong
Compared with very fine mosaic, approximately 25 mm pieces provide:
- less grout
- more stone
- clearer natural variation
while remaining significantly smaller than conventional floor tile.
Larger Mosaic Pieces
Larger pieces may work in some shower geometries.
But as chip size increases, it becomes more important to evaluate:
- slope
- drain position
- cut geometry
- plane changes.
Do not select a larger format without drawing the actual shower floor.
Square Mosaic
Square mosaic is often one of the easiest formats to coordinate because it has:
- simple grid geometry
- clear cuts
- relatively straightforward transitions.
It can work well where the marble itself should be the primary visual feature.
Small Hexagon Mosaic
Hexagon introduces stronger geometry.
Compared with square mosaic, it creates:
- more distinctive pattern
- more complex drain relationships
- more irregular sheet edges.
This can work beautifully, but the drain should be coordinated with the hexagonal grid.
Do Not Place a Drain Randomly Inside a Hexagon Pattern
If the drain lands arbitrarily, installation may require:
- tiny triangular pieces
- broken hexagons
- irregular fragments.
These details can weaken an otherwise precise bathroom.
Plot the drain in the actual mosaic drawing.
Penny Round Marble Mosaic
Penny round provides:
- many joints
- soft geometry
- high visual grout participation.
The circular pieces can create a more tactile floor appearance.
Because the spaces around circles are visually prominent, grout color becomes especially important.
Penny Round + Matching Grout
Can produce a softer field.
Penny Round + Contrasting Grout
Can turn the floor into a much stronger dotted graphic.
For a luxury marble bathroom, test this physically rather than relying only on a rendering.
Herringbone on Shower Floors
Herringbone can be used in appropriate shower applications, but it adds directional complexity.
The architect must coordinate:
- pattern axis
- drain
- slope
- perimeter cuts
- sheet transitions.
A simple square mosaic is often easier to resolve geometrically.
Herringbone should be chosen because the design benefits from it, not simply because it is decorative.
Chevron on Shower Floors
Chevron is even more directionally sensitive.
Continuous V-lines can become visibly distorted if:
- slope changes
- drain cuts
- perimeter conditions
are not coordinated carefully.
For a small shower floor, verify whether enough complete pattern remains visible after cuts.
Complex Pattern vs Complex Geometry
A useful principle is:
the more complex the shower geometry, the simpler the mosaic can be.
For example:
multi-directional slope + central point drain
may benefit from:
simple small square mosaic.
A more straightforward linear-drain shower may provide greater freedom for directional patterns.
Point Drain vs Linear Drain
Drain type is one of the most important design decisions affecting mosaic layout.
Point Drain
A point drain typically requires the floor to direct water from multiple directions toward one relatively small location.
This often creates several sloping planes.
Small-format mosaics are particularly useful for this geometry.
Point Drain Pattern Planning
The drain can be positioned:
- on a mosaic joint
- centered on a pattern module
- intentionally within a field
depending on geometry.
The objective should be to avoid awkward fragments.
Linear Drain
A linear drain can allow a simpler slope strategy in many shower designs.
Depending on the system, the shower floor may slope primarily in one direction.
This can simplify:
- large-format transitions
- directional mosaic
- edge cuts.
Linear Drain at the Wall
A wall-side linear drain can create a particularly clean layout.
The mosaic may flow toward:
- one continuous drainage line
rather than surrounding a central point.
This can reduce visual disruption.
Linear Drain at the Entrance
An entrance drain creates different detailing.
Coordinate it with:
- shower glass
- curbless transition
- bathroom floor
- waterproofing.
The design should not be decided only from appearance.
Drain Location Should Be Fixed Early
Moving a drain after the mosaic layout is complete can change:
- slopes
- cuts
- pattern alignment
- waterproofing
- quantity.
Treat it as an architectural control point.
Floor Slope Comes Before Mosaic Pattern
Water must drain correctly.
The decorative pattern should respond to the designed floor geometry.
Never compromise drainage simply to preserve:
- full hexagons
- perfect herringbone
- a continuous marble vein.
Water management has priority.
Do Not Specify One Universal Slope Without Checking the System
Required slope depends on:
- applicable codes
- drain system
- wet-area assembly
- project jurisdiction.
Use the current requirements for the project.
The important design principle is that the finished system must create reliable positive drainage.
Draw the Slope
For important shower details, drawings should show:
- high points
- drain
- slope direction
- transition.
Do not rely only on a note saying:
“slope to drain.”
Curbless Marble Showers
Curbless showers can create very clean architectural continuity.
But they require careful control of:
- floor elevation
- waterproofing
- drainage
- shower glass
- adjacent bathroom flooring.
The transition should be designed before the stone package is finalized.
Large Marble Bathroom Floor + Mosaic Shower Floor
One effective strategy is:
large-format honed marble outside
→
same marble in small mosaic inside shower.
This preserves material continuity while allowing the wet zone to use a more adaptable format.
Transition Line
The transition can occur at:
- shower glass
- drain
- architectural threshold
- another intentional datum.
Avoid random format changes.
Level Coordination
Mosaic and large-format marble may have different:
- stone thickness
- mesh/backing
- setting-bed requirements.
The construction build-up should create the intended finished level.
Do not discover this difference after installation begins.
Mosaic Sheet Size
Architects often focus on chip size and forget sheet size.
A shower-floor product may be delivered on sheets around:
- 250–300 mm
- 300 mm
- another geometry-specific size.
Irregular patterns often produce irregular sheet shapes.
Request the actual product dimensions.
Chip Size Is Not Sheet Size
For example:
a 25 mm mosaic may still be supplied as an approximately:
300 mm sheet.
The smaller number describes the visible pieces.
The larger number describes the installation unit.
Both matter.
Sheet Boundaries Must Disappear
The finished shower floor should not appear as:
a grid of 300 mm squares.
The eye should see:
one continuous mosaic surface.
This requires careful sheet spacing.
Internal Joint vs Sheet Joint
The gap between two sheets should visually correspond with:
- the spacing between chips inside each sheet.
If sheet spacing is wider, the finished floor may reveal obvious rectangular boundaries.
Installer Adjustment May Be Necessary
Mesh mounting is not a substitute for craftsmanship.
Installers may need to make small local adjustments so:
- joint spacing
- pattern
- drain cuts
remain visually consistent.
Mesh-Mounted Marble Mosaic
Mesh backing is common because it keeps many small pieces together.
But wet areas create additional questions.
The design team should understand:
- type of backing
- backing coverage
- adhesive used to hold pieces to mesh
- compatibility with the proposed setting material.
Not Every Backing System Should Be Assumed Suitable for Wet Exposure
Some stone products may have:
- fiberglass mesh
- substantial backing resin
- other reinforcement.
These systems need technical compatibility review in wet areas.
Do not automatically specify the same installation method used for an unbacked stone tile.
Setting Material Needs Contact with the Stone System
The complete bonding assembly should be selected for:
- stone
- backing
- substrate
- waterproofing
- water exposure.
A beautiful mosaic that is poorly bonded remains a failed specification.
Waterproofing Is Below the Mosaic
The marble mosaic itself does not waterproof the shower.
Neither does:
- grout
- impregnating sealer.
The shower requires a properly designed waterproof assembly.
Shower Floor Assembly
A typical conceptual sequence may include:
structural/supporting substrate
→
appropriate wet-area preparation
→
waterproofing system
→
approved setting material
→
marble mosaic
→
grout
with the exact assembly determined by the project system.
The architect should coordinate the specified products rather than mixing unrelated installation methods.
Waterproofing and Drain Must Form One System
The drain connection is one of the most important interfaces.
Waterproofing should terminate or connect to the selected drainage system according to the approved method.
A beautiful marble surface cannot correct an improperly resolved drain connection.
Substrate Preparation
The mosaic will reproduce the shape of the surface underneath it.
Poor preparation can create:
- dips
- humps
- uneven slope
- irregular drainage
- distorted joints.
The substrate should therefore be properly formed before mosaic installation.
Mosaic Does Not Hide Bad Slope
Small pieces can conform to the substrate.
That means they can also faithfully reproduce:
a bad substrate.
Mosaic flexibility is not an excuse for poor floor preparation.
Low Spots
A depression in the shower floor can collect:
- water
- soap residue
- minerals.
These conditions are both:
- operational
- visual problems.
Check the floor geometry before stone installation.
Wet Slip Performance
Shower floors are walking surfaces used while:
- wet
- barefoot
- potentially contaminated with soap.
This deserves explicit safety review.
Do Not Specify by Marketing Language
Terms such as:
- anti-slip
- non-slip
- safe finish
should not be accepted without understanding:
- test method
- surface tested
- test condition
- applicability to natural stone.
Stone Density and Finish Both Matter
Different natural stones and different finishes can produce different frictional behavior.
Therefore:
honed marble A
does not automatically perform identically to:
honed marble B.
Test the actual proposed surface where required.
DCOF and Natural Stone
Dynamic coefficient of friction testing is one method used to evaluate surface friction.
But the architect should ensure:
- the method is applicable
- the tested condition corresponds to the project
- local regulatory requirements are satisfied.
One generic number should not replace professional safety evaluation.
Do Not Copy a Ceramic-Tile Threshold Blindly to Natural Stone
Test protocols and product requirements can differ.
Use:
- current natural-stone guidance
- applicable standards
- project-specific requirements.
Surface Finish
The same marble can have different finishes.
Possible shower-floor approaches may include:
- honed
- textured
- other stone-specific finishes
where technically appropriate.
Honed Marble
Honed stone offers:
- lower reflection
- softer color
- contemporary appearance.
It is frequently considered for bathrooms.
But the finish name itself is not a safety certification.
Textured Stone
A textured finish may increase surface roughness.
This may influence frictional performance.
But it may also influence:
- cleaning
- soap retention
- visual character.
A shower floor should remain practical to maintain.
Extremely Rough Is Not Automatically Better
Increasing texture without considering maintenance can create surfaces that retain:
- soap
- oils
- mineral residue.
The design should balance:
surface performance
and
cleanability.
Polished Marble
Polished marble is generally more reflective and may become more challenging under wet-foot traffic.
Do not extend polished wall finishes onto shower floors without a separate performance review.
Grout Is a Major Part of a Mosaic Shower Floor
With small mosaics, the grout occupies significantly more surface area than on large-format tile.
The grout therefore affects:
- color
- geometry
- cleaning
- tactile experience.
It should be selected as part of the floor design.
No Universal Grout Joint Width
Joint width depends on:
- chip dimensions
- manufacturing tolerances
- edge condition
- sheet construction
- grout system.
Do not apply one fixed number to every mosaic.
Maintain Consistent Joint Character
The joint between sheets should not appear wider than:
- internal chip joints.
The entire floor should read continuously.
Grout Color
A matching grout can:
- reduce visual noise
- emphasize marble.
A contrasting grout can:
- strengthen the pattern
- emphasize every chip.
For shower floors, visual preference also needs to account for:
- cleaning
- staining behavior
- product compatibility.
Test Grout with the Actual Marble
Especially with pale marble, review:
- pigment interaction
- scratching
- cleanup
- final appearance
before large-scale installation.
Dark Grout + White Marble
This creates strong contrast.
But it can also make:
- dimensional irregularity
- joint inconsistency
more visible.
The more contrast you introduce, the more precise installation becomes visually necessary.
Changes of Plane
Floor-to-wall transitions should not simply be treated as another normal rigid mosaic joint.
Movement accommodation should be detailed according to the approved system.
Typical changes include:
- shower floor to wall
- bench to wall
- curb to floor
- niche returns.
Flexible Joints
Where the system requires flexible sealant or another movement detail, coordinate:
- joint dimension
- color
- location.
Do not rigidly grout across a movement condition simply to make the floor look seamless.
Perimeter Joints
The edge of the shower floor should interact correctly with:
- walls
- curbs
- glass
- channels
while allowing the complete assembly to perform.
Shower Glass
Curbless glass can affect floor detailing.
Coordinate:
- glass location
- channel
- bracket
- waterproofing
- mosaic cuts.
Do not drill into a completed wet-area assembly without a coordinated detail.
Glass Channel and Mosaic Grid
A long channel crossing a mosaic pattern can create numerous tiny cut pieces.
Model the channel in the floor layout before fabrication.
Curbs
Where a curb is used, decide whether it is:
- solid marble
- tiled
- mosaicked
- another material.
The top should be designed as a wet horizontal surface with appropriate drainage.
Solid Marble Curb
A single cut stone piece can create a clean appearance.
Coordinate:
- width
- edge
- slope
- joints
- shower glass.
Marble Mosaic Curb
Continuing floor mosaic onto a curb creates more joints.
This can work visually but increases detailing complexity.
Shower Benches
A bench is another wet horizontal surface.
The seat should not be treated like a dry stone shelf.
Coordinate:
- slope
- joints
- wall interface
- waterproofing
- edge.
Wall-to-Floor Marble Relationship
The floor pattern should complement the wall.
Possible combinations include:
Calm Floor + Dramatic Wall
Small neutral marble square mosaic beneath bookmatched slab walls.
Geometric Floor + Calm Wall
Hexagon or penny round beneath relatively uniform slab walls.
Same Marble, Different Scale
Often one of the most cohesive strategies.
Avoid Too Many Competing Patterns
A bathroom containing:
- bookmatched marble walls
- herringbone shower floor
- checkerboard bathroom floor
- patterned niche
can become visually overloaded.
Natural stone already contains pattern.
Establish hierarchy.
Marble Mosaic and Drain Finish
Drain finish can coordinate with:
- chrome
- brushed stainless
- bronze
- black
depending on bathroom hardware.
But drain color should not override technical compatibility.
Tile-Insert Drains
Certain drain designs allow stone or mosaic inserts.
These can reduce visual prominence.
But they add fabrication and cleaning considerations.
Ensure the design works with:
- drainage openings
- stone thickness
- access for cleaning.
Marble Around Drain Openings
Avoid excessively narrow stone fragments.
Small fragile pieces around the drain can be:
- difficult to fabricate
- difficult to install
- visually messy.
Adjust the pattern or drain position when possible.
Floor Layout Drawing
A professional shower-floor drawing should show:
- shower dimensions
- drain
- slope direction
- mosaic orientation
- glass
- curb or threshold
- wall interfaces.
For directional mosaics, add:
- pattern axis.
Draw the Actual Pattern
Do not use a generic cross-hatch for:
- hexagon
- herringbone
- penny round.
The pattern geometry affects the drain relationship.
Shop Drawings
For custom hotel packages or complex showers, shop drawings can coordinate:
- exact floor area
- drain opening
- mosaic type
- transition
- threshold
- wall panels.
The floor should not be designed independently from the rest of the stone package.
Shower-Floor Mock-Up
For important projects, an installed mock-up can be extremely valuable.
Especially when using:
- unfamiliar marble
- custom mosaic
- unusual grout
- resin-backed stone
- specific wet-slip requirements
- hotel repetition.
Mock-Up Several Sheets
One loose 300 mm sheet cannot reveal:
- sheet boundaries
- actual grout
- slope
- drain detailing.
A meaningful mock-up should include enough area to evaluate the system.
Include a Drain in the Mock-Up
If drain detailing is a critical part of the project, include:
- actual drain type
- representative slope
- mosaic cuts.
This tests the difficult part rather than only the easy flat area.
Hotel Bathroom Applications
Hotels magnify small detailing problems.
A problematic shower-floor condition repeated in:
150 rooms
becomes a major project issue.
The prototype room is therefore extremely valuable.
Standardize the Geometry
Repeated rooms should ideally use coordinated:
- shower dimensions
- drain position
- mosaic format
- glass location
- threshold.
This improves production and installation consistency.
Natural Stone Will Still Vary
Standardized room geometry does not mean every marble chip will look identical.
Define an acceptable:
- color range
- vein range.
Natural variation should remain visible.
Pre-Cut Room Kits
Depending on the project, shower-floor packages may be coordinated by:
- room
- type
- floor.
This can simplify site logistics.
For custom patterns, special pieces can also be identified by room.
Quantity
Do not calculate mosaic only from:
net shower floor area.
Consider:
- cuts
- drain
- directional pattern
- waste
- spare material.
Small Square Mosaic
Can often provide efficient cutting because the pattern is simple.
Directional Mosaic
Herringbone and chevron may produce more:
- perimeter waste
- special cuts.
The exact quantity should be evaluated from the actual layout.
Irregular Sheets
For:
- hexagon
- penny round
- herringbone
the external dimensions of one sheet may not equal its effective coverage.
Use actual product coverage when ordering.
Order Spare Sheets
For significant projects, retain original spare mosaic.
Future batches may differ in:
- marble tone
- vein distribution
- chip dimension
- finish.
This is particularly valuable for hotel maintenance.
Moisture and Light Marble
Light marble shower floors sometimes develop darker areas during use or drying cycles.
Possible causes can involve:
- natural absorption
- trapped moisture
- installation conditions.
The design team should understand the actual stone and assembly before treating every change in tone as a material defect.
The Assembly Must Be Able to Dry as Designed
Wet-area performance depends on:
- water management
- drainage
- installation method
rather than only on whether the stone has been impregnated.
Do Not Attempt to Solve Moisture Problems with More Sealer
If a shower floor remains persistently dark, first investigate the:
- drainage
- waterproofing
- setting assembly
- moisture path.
Applying additional surface treatment may not address the underlying cause.
Marble Care on Shower Floors
Routine care for many conventional marble mosaics should use:
- appropriate mild non-acidic cleaners
- soft brushes or cloths
- regular rinsing
- appropriate drying.
Maintenance must also consider the grout.
Avoid Acidic Bathroom Cleaners
Many marbles are calcium-carbonate based.
Acidic products can etch them.
Avoid routine use of:
- vinegar
- acidic descalers
- lemon-based cleaners
unless compatibility with the actual material has been established.
Soap Residue
Soap film can affect both:
- appearance
- surface behavior.
Regular cleaning should prevent excessive buildup.
Mineral Deposits
Hard water can leave visible deposits.
Do not automatically remove these with aggressive acidic products on acid-sensitive marble.
Use stone-compatible maintenance procedures.
Impregnating Treatment
An appropriate impregnator may improve resistance to some staining for some stones.
But it does not:
- waterproof the shower
- prevent acid etching
- guarantee slip resistance.
These functions should never be confused.
Architect’s Marble Mosaic Shower Floor Checklist
Before issuing the specification, confirm:
Stone
- exact marble
- representative mosaic sample
- wet-area suitability
- absorption data where relevant
- soundness
- backing or reinforcement.
Mosaic
- chip size
- geometry
- actual sheet size
- effective coverage
- thickness
- finish
- mounting system.
Floor Geometry
- shower dimensions
- point or linear drain
- slope
- curb or curbless condition
- transition.
Performance
- applicable wet-slip requirements
- actual finish
- relevant test data.
Wet-Area Assembly
- substrate
- waterproofing
- drainage system
- setting material
- stone/backing compatibility.
Joints
- internal mosaic spacing
- sheet-to-sheet spacing
- grout
- movement conditions
- perimeter sealant.
Details
- drain cuts
- glass
- curb
- bench
- floor-to-wall condition
- threshold.
Visual Design
- floor pattern
- pattern orientation
- wall relationship
- grout color.
Approval
- sample
- several-sheet layout
- grout test
- installed mock-up
- drain mock-up where required.
Production
- dimensional consistency
- sheet quality
- stone range
- finish
- special cuts.
Logistics
- quantities
- waste
- room identification
- spare material.
Maintenance
- approved cleaning method
- acid restrictions
- grout maintenance
- treatment requirements.
A shower floor is small in square meters but high in technical importance.
Questions Architects Should Ask a Mosaic Supplier
- What is the exact marble?
- Is this selection recommended for wet exposure?
- What is the actual chip size?
- What is the real sheet dimension?
- What is the effective coverage per sheet?
- What is the mosaic thickness?
- What finish is applied?
- How is the mosaic mounted?
- Does the mosaic have mesh or resin on the back?
- Is the backing compatible with wet-area installation?
- What relevant stone test data is available?
- Can the actual finish be tested for friction where required?
- Can we review several sheets together?
- Can the proposed drain be shown in the mosaic layout?
- Can custom drain pieces be pre-cut?
- Can the mosaic be supplied by room or shower type?
- Can a larger project mock-up be prepared?
- What natural color range should be expected?
- What grout has been tested with the stone?
- Can spare material be retained from the original production?
These questions help distinguish between:
a decorative mosaic product
and
a shower-floor system ready for architectural specification.
Common Marble Mosaic Shower Floor Mistakes
Choosing the Pattern Before the Drain
Drain geometry controls part of the floor layout.
Assuming Small Mosaic Is Automatically Slip-Safe
Actual surface performance still matters.
Assuming Honed Means Non-Slip
The term alone does not prove performance.
Copying Ceramic Slip Data to Marble
Use information applicable to the actual proposed surface.
Using the Wall Finish on the Floor Without Review
Vertical and horizontal wet conditions differ.
Using Very Large Pieces Around a Point Drain
The geometry may become difficult to resolve.
Cutting Hexagons Randomly Around the Drain
The pattern becomes visually weak.
Using Herringbone Without Showing Slope
Directional geometry may distort.
Assuming Every Mosaic Sheet Is 300 × 300 mm
Actual formats vary.
Allowing Sheet Boundaries to Remain Visible
The installed field should read continuously.
Ignoring Mesh or Resin Backing
Wet-area bonding compatibility matters.
Treating Grout as Waterproofing
The shower needs a dedicated wet-area assembly.
Treating Sealer as Waterproofing
Impregnation is not a membrane.
Failing to Coordinate Curbless Levels
Adjacent floor build-ups may not align.
Using Zero Joints
Real mosaic requires controlled spacing.
Rigidly Grouting Every Change of Plane
Movement conditions need appropriate detailing.
Testing Only One Loose Sheet
This reveals little about slope, drain or sheet-to-sheet behavior.
Skipping Prototype Bathrooms in Large Hotels
Small problems can then repeat hundreds of times.
Using Acidic Descaler on Marble
Calcareous stone can etch.
Trying to Solve Persistent Moisture with More Sealer
The real issue may be inside the assembly.
A Practical Shower-Floor Specification Workflow
1. Define the Shower Geometry
Size, glass, threshold and bench.
2. Select the Drain Strategy
Point or linear.
3. Establish Drain Location
Before pattern design.
4. Design the Required Floor Geometry
According to the approved system and applicable requirements.
5. Shortlist Suitable Marble
Based on wet-area performance and design.
6. Select Finish
Review actual walking-surface requirements.
7. Test Mosaic Sizes
Compare small square, larger square or another suitable format.
8. Draw the Real Mosaic Pattern
Not a generic hatch.
9. Resolve Drain Cuts
Avoid tiny fragile fragments.
10. Coordinate Curbless or Curb Conditions
With adjacent bathroom floor.
11. Confirm Mosaic Sheet Geometry
Chip, sheet, thickness and backing.
12. Select Waterproofing and Setting System
As one coordinated assembly.
13. Verify Backing Compatibility
Especially mesh- or resin-backed products.
14. Review Grout
Performance and visual appearance.
15. Prepare a Mock-Up
For important or repeated applications.
16. Test the Difficult Detail
Include drain and slope where necessary.
17. Approve Production Sample
Stone range, format and finish.
18. Calculate Quantity from Actual Coverage
Include cuts and spares.
19. Quality Control
Review several adjacent sheets.
20. Install According to the Approved Wet-Area System
The result should connect:
drainage
with
architecture
rather than forcing one to compromise the other.
Final Thoughts
Marble mosaic can be an excellent shower-floor material when the complete system is deliberately designed.
Its strength is not simply:
small pieces look good in bathrooms.
Its real architectural value is that small natural-stone units can respond to:
- slope
- drainage
- compact floor geometry
while allowing the bathroom to maintain genuine natural-stone continuity.
But mosaic size alone cannot guarantee performance.
The architect still needs to resolve:
the stone
the finish
the drain
the slope
the sheet
the backing
the waterproofing
the setting system
the grout
and
the maintenance.
Begin with water management.
Fix the drain location.
Design the floor geometry.
Then select the mosaic scale.
Use actual product dimensions.
Review the backing.
Do not assume honed means non-slip.
Do not assume mosaic means safe.
Do not assume grout waterproofs the shower.
Do not assume a sealer will solve moisture problems.
And do not approve a repeated hotel shower from one loose sample sheet.
A successful marble shower floor is not defined by how small the stone pieces are.
It is defined by how carefully all of those small pieces have been integrated into:
one complete wet-area system.
Frequently Asked Questions
Is marble mosaic good for shower floors?
Certain marble mosaics can be appropriate for shower floors when the actual stone, finish, mosaic size and complete wet-area assembly are suitable for the project.
What size marble mosaic is best for a shower floor?
There is no universal best size. Smaller formats can adapt more readily to complex slopes, while somewhat larger mosaics show more natural stone. Drain geometry, slope and surface requirements should guide the selection.
Is 25 × 25 mm marble mosaic suitable for shower floors?
It can be suitable for certain designs and systems, but suitability depends on the actual stone, finish, drain, slope, joints and required wet-floor performance.
Is 10 × 10 mm mosaic better for shower floors?
Very small pieces offer high joint density and can accommodate complex floor geometry well, but they also create more visible grout. They are not universally better.
Are hexagon marble mosaics suitable for shower floors?
They may be, provided the actual stone, finish and installation system are appropriate. Drain and perimeter geometry should be coordinated carefully.
Is penny round marble good for shower floors?
Penny round can work well in certain wet-area designs because of its small geometry and high joint density, but actual surface performance and installation requirements still need evaluation.
Can herringbone marble be used on a shower floor?
Potentially. Herringbone adds directional pattern complexity, so the slope, drain and perimeter cuts should be studied at full scale before specification.
Is marble mosaic non-slip?
No mosaic should be assumed non-slip simply because it contains many joints. Actual stone, finish, contamination and relevant test requirements must be considered.
Is honed marble safe in a shower?
“Honed” describes a finish, not a universal safety rating. Wet-surface performance should be evaluated for the exact stone and finish.
Can polished marble be used on a shower floor?
Polished stone may raise greater wet-friction concerns and should not be specified without appropriate performance evaluation for the actual surface.
Does grout make mosaic floors safer?
Grout joints can affect surface behavior, but grout density alone does not establish shower-floor safety.
Does marble mosaic waterproof a shower?
No. Mosaic is the finish layer. A shower requires an appropriate waterproofing and drainage system.
Does grout waterproof a shower floor?
No. Grout does not replace the waterproofing assembly.
Does sealing waterproof marble mosaic?
No. An impregnating treatment may improve resistance to certain stains but is not the primary waterproofing system.
Are mesh-backed marble mosaics suitable for showers?
They may be, but the mesh and backing adhesive need to be compatible with the proposed wet-area setting system. Suitability should not be assumed.
Is a linear drain better for marble mosaic?
A linear drain can simplify floor geometry in certain designs, but it is not universally better. The choice should follow the shower architecture and approved drainage system.
Is a point drain suitable for marble mosaic?
Yes. Small mosaic is often well suited geometrically to multi-directional slopes around a point drain when the system is properly designed.
Should the drain be positioned before selecting the mosaic?
Ideally, drain location and shower geometry should be established early because they influence slope and mosaic cuts.
Can large marble bathroom tiles transition into small shower mosaic?
Yes. Using the same marble in a large bathroom-floor format and smaller shower-floor mosaic can create strong material continuity.
Should hotel shower floors be mocked up?
For large repeated hospitality projects, a prototype or mock-up can be highly valuable for checking slope, drain, grout, mosaic scale, stone range and installation quality.
Can vinegar be used on marble shower mosaic?
Acid-sensitive marble should not routinely be cleaned with vinegar because acids can etch calcium-carbonate surfaces.
Does sealer prevent marble from etching?
No. Impregnation does not remove the acid sensitivity of conventional calcitic marble.
Specifying Marble Mosaic for a Shower Project?
VeraMarbles supports architects and interior designers developing natural-stone shower floors for residential, hospitality and commercial projects.
Send us your:
- shower floor plan
- drain type and position
- shower dimensions
- preferred marble
- mosaic format
- target chip size
- finish
- estimated quantity
- bathroom elevations
- project location
- project schedule
We can support your project with:
- marble selection
- square marble mosaics
- custom mosaic sizes
- hexagon
- penny round
- herringbone
- custom patterns
- mosaic sample production
- sheet development
- drain-layout coordination
- custom drain cutting
- finish samples
- visual-range coordination
- hotel bathroom production
- room-based packing
- quality control
- spare-material coordination